


Install DS1/T1 CPE loopback jack
Issue 10 June 2005 325
Install DS1/T1 CPE loopback jack
This section provides information on how to install and use a DS1 loopback jack to test the DS1
span between the Avaya Media Server or Gateway and the network interface point. The
loopback jack is required when DC power is at the interface to the integrated channel service
unit (ICSU).
Note:
Note: Do not remove the loopback jack after installation. It should always be available
for remote tests of the DS1 span.
For earlier media gateway systems, the integrated channel service unit (ICSU) — also known
as the 120A2 — is a separate device that plugs into the back of the media gateway.
Installing a loopback jack
You can install a loopback jack with or without a smart jack.
With a smart jack
Install the loopback jack at the interface to the smart jack, if possible. This position provides
maximum coverage of CPE wiring when remote loopback tests are run.
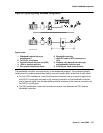
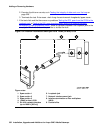
If the smart jack is not accessible, install the loopback jack at the extended demarcation point.
If there is no extended demarcation point, install the loopback jack directly at the network
interface point as shown in Figure 102
.
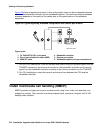
If there is an extended demarcation point and the smart jack is not accessible, install the
loopback jack as shown in Figure 103
.
If there is an extended demarcation point, but the smart jack is accessible, install the loopback
jack as shown in Figure 104
.
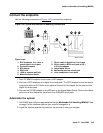
1. To install the loopback jack, simply disconnect the RJ-48 (8-wide) connector at the
appropriate interface point and connect the loopback jack in series with the DS1 span. See
Figure 102
through Figure 106.
2. Plug the H600-383 cable from the ICSU into the female connector on the loopback jack.
3. Plug the male connector on the loopback jack cable into the network interface point.
Note:
Note: Do not remove the loopback jack after installation. This is not a test tool and
should always be available to remotely test a DS1 span.