


Chapter 6: User Interface New Work Item
Altiris Helpdesk Solution User Guide 52
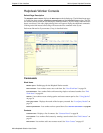
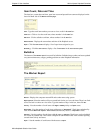
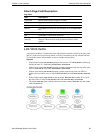
Add New Work Item
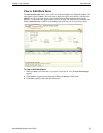
1 Type a description for the new work item in the Title box. The title is a required field. All the
other fields are optional, or have default values.
2 Type additional Comments in the box.
3 Select a Category from the drop-down list.
4 Select the Priority status from the drop-down list.
5 Select an Assigned worker or queue to assign the work item to from the drop-down list. The
default option of
--(unassigned)-- will automatically assign the work item to the worker or queue
according to the Routing Rules defined.
6 Select the Status of the work item from the drop-down list.
7 Select the Type of work item from the drop-down list.
8 Type an External ID number in the box.
9 Select either Scheduled or Not Scheduled from the drop-down list.
10 Select a Start date for the work item, the default option is the current day. Click the box icon to
the right of the date field to open the current calendar month and select the appropriate date. Click
the box icon again to close the calender window.
11 Select a Due date for the work item, the default option is the current day. Click the box to the
right of the date field to open the current calendar month and select the appropriate date. Click
the box again to close the calender window.
12 Select any Notify rules check boxes that you want associated with this work item. Default rules
will be pre-selected by the administrator. Additionally, the administrator can lock down notify
rules to prevent workers from making any changes. These rules are evaluated and e-mail
generated when the work item is saved.
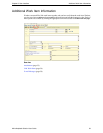
13 Click View contact properties to view and edit the contact information associated with the work
item. For more information, see “View Contact Properties - New Work Item” on page 59.
14 Click View asset properties to view and edit the asset information associated with the work item.
For more information, see “View Asset Properties - New Work Item” on page 63.
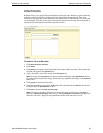
15 Click E-mail to send an e-mail notifications about the current work item to other workers, queues
or select individuals. For more information, see “E-mail Messages” on page 58.
16 Click Link to link the current work item to another work item. For more information, see “Link
Work Items” on page 56.
17 Click Attach to add additional file information to the work item. For more information, see
“Attachments” on page 55.
18 Click Select a contact to associate a contact with the current work item. For more information,
see “Find Contact - New Work Item” on page 61.
19 Click Select an asset to associate an asset with the current work item. For more information, see
“Find Contact - New Work Item” on page 61.
20 Click Save. The work item you created will display in the View work item page.
<OR>
21 Click Save and start a new one. The work item is saved, and the New work item page is displayed
for you to create a new work item.