


PROBLEM SOLVING ERROR CODES
Xerox 495 Continuous Feed Duplex Printer Operator Guide Page 9-23
0D-08 Incomplete paper width measure-
ment
The paper width was set manually but LOAD was not pressed on
the autoload panel.
1. Press LOAD on the autoload panel.
2. Press RESET on the touch screen and then set the printer to
ready.
0D-10 Back tension cover open 1. Close the back tension cover of the printer.
2. Press RESET on the touch screen and then set the printer to
ready.
0D-11 Hopper bar not set/Seam detected
(during autoloading)
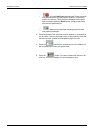
1. Raise the hopper cover.
2. Change the position of the hopper bar lever, on the left side of
the hopper.
3. Lower the hopper cover.
4. Press RESET on the touch screen and then set the printer to
ready.
0D-12 Hopper cover open 1. Close the hopper cover.
2. Press RESET on the touch screen and then set the printer to
ready.
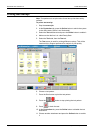
12-01 Autoload time-out 1. Press RESET on the touch screen.
2. Remove the paper jam (see "Clearing paper jams" on page 9-
3).
3. Restart the autoload procedure (see "Paper autoloading" on
page 5-4).
4. Press LOAD on the autoload panel.
13-02 Pinch roller pressure motor A alarm An overcurrent was detected in pinch roller pressure motor A.
1. Check the printing status and the paper position.
2. Press RESET on the touch screen and then set the printer to
ready.
13-03 Pinch roller pressure motor B alarm An overcurrent was detected in pinch roller pressure motor B.
1. Check the printing status and the paper position.
2. Press RESET on the touch screen and then set the printer to
ready.
13-04 Pinch roller pressure motor A time-
out
An operation failure was detected in pinch roller pressure motor A.
1. Check the printing status and the paper position.
2. Press RESET on the touch screen and then set he printer to
ready.
13-05 Pinch roller pressure motor B time-
out
An operation failure was detected in pinch roller pressure motor B.
1. Check the printing status and the paper position.
2. Press RESET on the touch screen and then set he printer to
ready.
13-06 Pinch roller A position error Pinch roller A was in the up position during printing.
1. Check the printing status and the paper position.
2. Press RESET on the touch screen and then set he printer to
ready.
13-07 Pinch roller B position error Pinch roller B was in the up position during printing.
1. Check the printing status and the paper position.
2. Press RESET on the touch screen and then set the printer to
ready.
Code Display Message Procedure