


RUNNING JOBS RUNNING PRODUCTION JOBS
Page 4-12 Xerox 495 Continuous Feed Duplex Printer Operator Guide
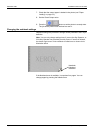
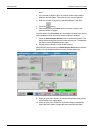
Bubble menu possibilities
Bubble menu command buttons depend on the exact equipment in the
print line. The following bubble menu command buttons are available for
the printer.
• Toggle button Start Print Position Check / Stop Print Position
Check:
• Start Print Position Check - When you press this button, paper
is forwarded to the stacker and the stacker automatically lowers.
This allows you to check the printing status on the stacker table.
• Stop Print Position Check - When you press this button, the
paper reverses to its original printing position.
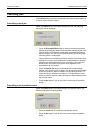
The Start / Stop Print Position Check procedure is:
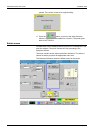
The following bubble menu command buttons are available, depending
on the device configuration.
• Eject button - This button will only work for the device from which
the eject is requested. This action will also take the printer out of
alignment. Press the button for as long as you want the printer to
eject paper. As the paper will only move in the selected device, there
are risks of paper breaks. Always make sure there is enough paper
available for the eject, or that the paper is cut. To do an eject for the
whole line, you should use the eject button in the action bar on the
screen.
• Release button - This button allows you to release paper to empty a
whole part of the line. When you release paper, all devices
downstream from the one that starts the release are in a state that
allows them to move paper. Therefore, if you choose Release from
the Unwinder bubble menu, all the paper in the print line will move.
Note: There exists the following limitation around the pre-processor
in a release situation. It is possible to press the Release button when
the pre-processor is off, Unwinder, for example. The problem is that
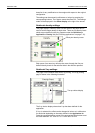
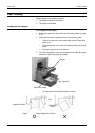
1. Set the printer to Not Ready. Print line device background = yellow.
Status window = yellow.
2. Press the Start Print Position
Check button.
Paper is forwarded to the stacker.
Print line device background = striped yellow/white.
Status window = green.
The stacker automatically lowers. The printer falls into error.
Print line device background = striped red/white.
Status window = red.
You can now check the printing status on the stacker table.
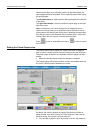
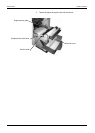
3. Press the Stacker Auto button. The stacker raises.
4. Press the RESET button to clear
the error.
Print line device background = striped yellow/white.
Status window = yellow.
Not Aligned displayed on the printer icon.
5. Press the Stop Print Position
Check button.
The paper reverses to its original printing position.
Print line device background = yellow.
Status window = yellow.
6. Set the printer to Ready. Print line device background = green.
Status window = green.