


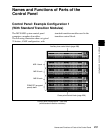
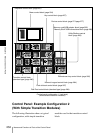

257Names and Functions of Parts of the Control Panel
Chapter 2 Menus and Control Panel
into the video on this M/E bank or
PGM/PST bank.
To select the key 1 fill signal, check
that the right-hand [KEY3] button in
the M/E bank (or the [DSK3] button in
the PGM/PST bank) is off, then press
the button assigned to the desired
signal. To select the key 3 fill signal,
press the [KEY3] button, turning it on.
While the [UTIL] button on the right
hand side is held down, these buttons
are assigned to the DME external video
bus allowing you to select the signal on
that bus.
Key 2 row: The buttons in this row select
the key 2 or key 4 signals to be inserted
into the video on this M/E bank or
PGM/PST bank.
To select the key 2 fill signal, check
that the right-hand [KEY4] button in
the M/E bank (or the [DSK4] button in
the PGM/PST bank) is off, then press
the button assigned to the desired
signal. To select the key 4 fill signal,
press the [KEY4] button, turning it on.
While the [UTIL] button on the right
hand side is held down, these buttons
are assigned to the DME utility 1 or 2
bus as follows.
• When the [KEY4] button is off,
holding down the [UTIL] button
assigns these buttons to the DME
utility 1 bus.
• Holding down the [UTIL] button and
pressing the [KEY4] button, turning
it on, assigns these buttons to the
DME utility 2 bus.
Background A row: Press the desired
button to select the signal as the current
background video on this M/E bank or
PGM/PST bank.
While the [UTIL] button on the right
hand side is held down in Hold mode,
these buttons are assigned to the utility
1 bus, and can be used to select the
signal on that bus.
Background B row: Press the desired
button to select the signal as the
background after the next transition on
this M/E bank or PGM/PST bank.
While the [UTIL] button on the right
hand side is held down in Hold mode,
these buttons are assigned to the utility
2 bus, and can be used to select the
signal on that bus.
Reentry buttons: These allow you to select
the video created on another bank as
background A or B or one of the keys 1
to 4. For example, to use the video
created on the M/E-1 bank as
background B on the M/E-2 bank, press
the reentry button [M/E 1] in the
background B row of buttons on the M/
E-2 bank.
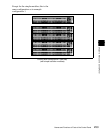
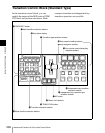
Cross-point button numbers
This description applies to the example of a
32-button system.
From the left, the first 31 buttons are
numbered 1, 2, ... 30, 31. When the 32nd
button is set to be a [SHIFT] button, these
buttons can also be switched to select
signals numbered from 32 to 62. While the
[SHIFT] button is held down, these switch
to numbers 32 to 62, or alternatively, every
time the button is pressed, switching is
made between numbers 1 to 31 and 32 to
62. Similarly, the reentry buttons can be
switched between two sets of numbers: 121
to 123, and 125 to 127.
Both the assignment of the 32nd button to a
[SHIFT] button and the selection of the
button operation mode can be done in a
Setup menu.
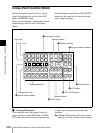
Assigning signals to button
You can assign a signal to each button using
the Setup menu.
This assignment is common to the cross-
point buttons in the M/E-1, M/E-2, M/E-3,
and PGM/PST banks, and the auxiliary bus