


342
Basic Operating Procedure
Chapter 3 Transitions
DME Wipe: “Basic Procedure for DME Wipe Settings” (page 466)
Clip transition: “Clip Transition Operations” (page 524)
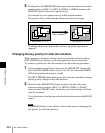
Using the transition preview function (page 363), you can check the
transition on the preview monitor.
7
Carry out the transition in the transition execution section.
For a gradual transition such as a mix (dissolve) or wipe: Press the
[AUTO TRANS] button, or operate the fader lever.
To execute a transition by pressing the [AUTO TRANS] button, first
set the transition rate (specified as the duration of the transition).
(See “Setting the Transition Rate” (page 352).)
When you have selected a wipe or DME wipe as the transition type,
you can also set the transition range. (See “Pattern Limit” (page 355).)
For an instantaneous transition: Press the [CUT] button.
For details, see “Executing a Transition” (page 351).
Transition linked to the audio mixer
If the video signal selected in the background B row is linked to the audio mixer
in setup, then the audio mixer sound changes with the transition. That is,
pressing the [AUTO TRANS] button gives a cross fade, and pressing the
[CUT] button gives an instantaneous sound switch.
For details of setup, see “Cross-Point Settings (Xpt Assign Menu)” in Chapter
16 (Volume 2).
Notes
• The audio mixer is not linked to a snapshot or key frame transition.
• The audio mixer is not linked to a transition using the fader lever.
• If the bus-fixed mode (see page 45) is selected in the setup menu, and the
fader lever is in the lowest position, there is a cross fade from the audio
selected on the B row to the audio selected on the A row.
• The audio mixer is not linked to a key transition.
• In the following cases, the audio and video may be out of sync.
– When carrying out a cross fade in some DME wipes (for example, “picture
in picture”)
– When executing a preset color mix in two-stroke mode
• For details of audio mixers that can be used, Sony service or sales
representative.