


21 Authentication and Accounting Features
Configuration for Authentication
This section describes the settings to use the Authentication feature on the machine.
The following shows the reference section for each procedure.
Enabling Authentication .........................................................................................................500
Changing the Default Authorization Group Settings............................................................503
Creating an Authorization Group...........................................................................................503
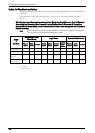
Installation Overview
To use the Authentication feature, configure the following settings.
Note • If job flow sheets, which are no longer available for use because of a change in the Login Type, are
linked to folders, they cannot be edited or copied, but still can be used. If you cancel the links,
however, the job flow sheets will no longer be displayed and will be unavailable.
Login to Local Accounts
Specify the Login Type and access control, and then create a user.
Login to Remote Accounts
Specify the Login Type, access control, and remote authentication server.
Change the default authorization group settings and add an authorization group, as
necessary.
Enabling Authentication
This section describes the procedures for [Login to Local Accounts] and [Login to Remote
Accounts] respectively.
When [Login to Local Accounts] is Selected
Perform the following procedures to use local authentication.
1
Press the <Log In/Out> button.
2
Enter the system administrator's user ID with the numeric keypad or the keyboard
displayed on the screen, and select [Enter].
When a passcode is required, select [Next] and enter the system administrator's passcode,
and select [Enter].
Note • The default user ID is "admin".
• The default passcode is "1111".
3
Select [Tools] on the [Home] screen.
4
Select [Authentication/Security Settings].
5
Select [Authentication].
6
Select [Login Type].
7
Select [Login to Local Accounts], and then select [Save].
For more information, refer to "Login Type" (P.408).
8
Select [Access Control].
500