


152 Using the iDRAC6 Directory Service
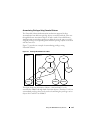
For example, Priv1 has these privileges: Login, Virtual Media, and Clear Logs
and Priv2 has these privileges: Login to iDRAC, Configure iDRAC, and Test
Alerts. As a result, User1 now has the privilege set: Login to iDRAC, Virtual
Media, Clear Logs, Configure iDRAC, and Test Alerts, which is the combined
privilege set of Priv1 and Priv2.
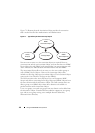
Extended Schema Authentication accumulates privileges to allow the user
the maximum set of privileges possible considering the assigned privileges of
the different privilege objects associated to the same user.
In this configuration, User1 has both Priv1 and Priv2 privileges on iDRAC2.
User1 has Priv1 privileges on iDRAC1 only. User2 has Priv1 privileges on both
iDRAC1 and iDRAC2. In addition, this figure shows that User1 can be in a
different domain and can be associated by a nested group.
Configuring Extended Schema Active Directory to
Access Your iDRAC6
Before using Active Directory to access your iDRAC6, configure the Active
Directory software and the iDRAC6 by performing the following steps:
1
Extend the Active Directory schema (see "Extending the Active
Directory Schema" on page 153.)
2
Extend the Active Directory Users and Computers Snap-in (see "Installing
Dell Extension to Microsoft Active Directory Users and Computers Snap-
In" on page 159.)
3
Add iDRAC6 users and their privileges to Active Directory (see "Adding
iDRAC Users and Privileges to Microsoft Active Directory" on page 160.)
4
Configure the iDRAC6 Active Directory properties using either the
iDRAC6 Web-based interface or the RACADM (see "Configuring
Microsoft Active Directory With Extended Schema Using the iDRAC6
Web-Based Interface" on page 162 or "Configuring Microsoft Active
Directory With Extended Schema Using RACADM" on page 164.)