


EliteMail VMS/EliteMail Limited Issue 3
Reference 9 - 25
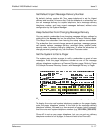
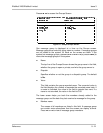
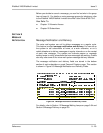
Add Group Members at the Console
1. At the voice mail system Banner Screen, press to sign in. Enter a
System Manager ID, and press . Enter the System Manager
security code, and press .
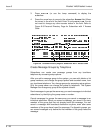
2. Press - to display the Groups Screen. Press or
(or use the Jump command) to display the message group you want.
3. Press . The system displays the pop-up Add Menu.
4. Check that Member is highlighted, and press . The system
asks you to enter the last name of the subscriber you want to add to
the message group.
5. Enter the first few letters of the person last name, and press .
The system displays the name of the first subscriber whose last
name matches the letters you entered.
6. Press to select the name. Press to view the next subscriber
whose last name matches the letters you entered. Press until the
name of the subscriber you want to add to the group is displayed.
Then, press .
7. Repeat steps 5 and 6 until you’ve added the subscribers to the
group.
8. Press to exit the Add Menu.
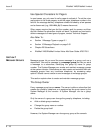
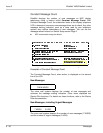
To add all the subscribers on the system to a group, at step 5
press
. The system displays the first name in the list of subscribers.
Press
to accept the name. Then,
press
repeatedly to accept
every name the system presents, until the system displays
Out of
Names
. Press any key to exit the Add Menu.
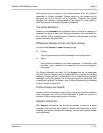
Guests can only be added to host private groups.
A subscriber
cannot
be the owner and a member of a private group.
A subscriber can be the owner and a member of an open group.
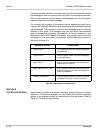
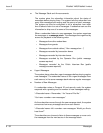
Remove Group Members at the Console
1. At the voice mail Banner Screen, press to sign in. Enter a System
Manager ID, and press . If asked, enter the System Manager
security code, and press .
2. Press - to display the Groups Screen. Press or
(or use the Jump command) to display the message group
you want.
3. Use the arrow keys to move the cursor to the name of the subscriber
you want to remove from the group.