Configuring and Managing Interactive Devices 11-5
Configuring an Interactive Device for LAT Sessions
Specifying AUTOCONNECT
When you disable the AUTOCONNECT characteristic on a given port, the access
server displays the local mode prompt after you log in. You can then enter the
CONNECT command to use a network resource.
When you enable the AUTOCONNECT characteristic on a given port and a dedicated
or preferred service is enabled, the port automatically connects a port to that service at
log in. The port also attempts to reestablish the current session if the connection fails.
You must enable AUTOCONNECT for a dedicated service port.
With preferred and dedicated service disabled, enabling AUTOCONNECT allows the
access server to attempt to reestablish any service connection that terminates
abnormally. If a service is not available when a connection attempt is made, the access
server repeatedly retries to connect as specified by the CONNECT command. This
feature is helpful when a user wants the access server to repeat connection attempts to
a currently non-operational service node. When a session is established with the node,
the access server notifies the user with a beep signal and a message.
Attempts to reconnect upon LAT session failure are made every 30 seconds. The
attempts continue until the user enters local mode by using the Break key or the local
switch key. Unless a dedicated service is in effect, a status message appears at the port
device indicating that the access server is trying to restart a session. The new
connection can be made to any service node that supplies the same service, unless a
node or destination was supplied in the CONNECT command or when the preferred
service was set up.
Example: Enabling AUTOCONNECT
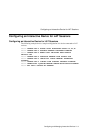
The following example shows how to enable AUTOCONNECT on port 5:
Local> CHANGE PORT 5 AUTOCONNECT ENABLED
2
Enable the applicable groups on the port as illustrated by the
following commands:
Local> CHANGE PORT 5 AUTHORIZED GROUPS 10,24,46
Local> SET PORT 5 GROUPS ALL ENABLED
3
If necessary, disable any unwanted group that was previously
enabled. The following commands show how to disable group 0 on
port 5:
Local> CHANGE PORT 5 AUTHORIZED GROUPS 0 DISABLED
Local> SET PORT 5 GROUPS ALL ENABLED
Step Action


