197
Configuring certificates with CentreWare Internet Services
Two methods are available to configure certificates with CentreWare Internet Services: creating a self-
signed certificate (for SSL server), and importing a signed certificate from a Certificate Authority.
This section describes how to create a self-signed certificate (for SSL server).
Important
When performing SSL communication using a self-signed certificate created on the machine, or a
certificate with which the character code is indicated by UTF-8, the following phenomena occur.
If Internet Explorer is used with Windows 98E or earlier, the issuer/issuing place of the certificate will
not be displayed correctly.
SSL connection will not be made if Internet Explorer is used with Mac OS X 10.2 or later. This is
because the operating system cannot recognize the character code (UTF-8) of the certificate. Use
Netscape 7 in the above-mentioned OS environments.
For information on how to import created certificates, refer to the CentreWare Internet Services online
help.
Important
When importing a certificate, if the same certificate has been already registered in [Local Device] or
[Others], the certificate cannot be imported. Delete the registered certificate before importing.
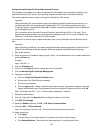
1. Start a web browser.
2. Enter the machine’s IP address, beginning with “https,” into the Address box of your web browser, and
press the Enter key.
Example:
https://192.168.1.1/
3. Click the Properties tab.
4. Click [+] on the Security folder to display the items in the folder.
5. Click on Machine Digital Certificate Management.
6. Generate a certificate.
a. Click the Create Self-Signed Certificate button.
b. Set the size of the Public Key as necessary.
c. Set Issuer as necessary.
d. Click the Apply button. When a screen to enter the user name and password appears, enter the
System Administrator user ID and password into User Name and Password, and then click OK.
Note: The default user ID is "11111" and the default password is "x-admin".
7. Refresh the web browser.
8. Click [+] on the left of the Security folder to display the items in the folder.
9. Click SSL/TLS Settings.
10. Select the Enable check box for SSL / TLS Server Communication.
11. Check the SSL / TLS Port Number.
Note: The correct port to use is 443. Do not use the numbers of any other ports.
12. Apply the settings.
a. Click Apply.
b. The right frame on the web browser will change to the machine reboot display.
c. Click Reboot Machine. The machine will be unavailable for a short period of time.


