46
8. The default [TRAP Community Name] is SNMP_trap, which you can use without changing. The
Default TRAP community name is used to specify the default community name for all traps generated
by this machine.
9. Click your browser Back button to return to the SNMP Configuration page, then click the [Advanced]
button.
10. Click [Add IP Address] in the Trap Destination addresses box.
11. Enter the multifunction device's IP address and leave all other parameters at their default values.
12. Click [Apply] to accept the changes.
13. When finished, click [Apply] to accept the changes.
To identify the trap
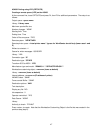
To identify the trap, create a device description from your terminal's command line.
1. Select the F-4 key to prompt the CRTDEVPRT command. Enter the following parameters:
• Device Description: Xeroxprinter
• Device Class: *lan
• Device Type: 3812
• Device Model: 1
2. Press Enter to continue, and enter the following parameters:
• Lan Attachment: *IP
• Port Number: 9100
• Online at IPL: *yes
• Font Identifier: 11
• Form Feed *autocut
Note: For some versions of AS400, the default may match some of these parameters.
3. Leave all other parameters at their defaults, press Enter, and enter the following parameters:
• Activation Timer: 170
• Inactivity Timer: *sec15
• Host Print Transform: *yes
4. Press [Enter] to continue, and enter the following parameter:
• Manufacturer Type and Model: *hp5si
5. Leave the remaining parameters set to their default values and press Enter to continue. Enter the
following parameters:
• Remote Location: Enter the IP address of the printer.
• User defined options: *IBMSHRCNN
• System driver program: *IBMSNMPDRV
6. Leave all other options set to the default values and press Enter. A message indicates that you
created the device Xeroxprinter.
7. Set the device on and start a print writer. Then place a spool file in the appropriate queue to test the
printer.


