


COPYRIGHT
©
1998 CANON INC. CANON NP6621 REV.0 FEB. 1998 PRINTED IN JAPAN (IMPRIME AU JAPON)
1–13
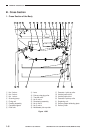
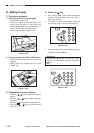
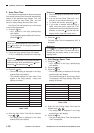
q Sorter key
w Two-sided key (left side)
e Two-sided key (right side)
r AE key
t Copy exposure key
y Reduce/1:1/Enlarge key
u Message display
Press to set or cancel the Sort, Staple Sort, and Group modes.
Sort mode: When copying a multi-page document, copies are automatically sorted into
sets arranged in page order.
* To use this mode, your copier must be equipped with the optional Stapler Sorter, Sorter,
or ADF/RDF.
Staple Sort mode: When copying a multi-page document, copies are automatically sorted
into sets arranged in page order and then stapled.
* To use this mode, your copier must be equipped with the optional Stapler Sorter.
Group mode: When copying a multi-page document, all copies of the same original page
are grouped together, and output into different bins.
* To use this mode, your copier must be equipped with the optional Stapler Sorter or Sorter.
Press to set or cancel the following two-sided copy modes: 1 2-sided, 2 2-sided, 2 1-sided, Book 2-sided.
1 2-sided: Makes two-sided copies from one-sided originals.
When you do not know the total page number of the original, the copier automatically
counts the original.
Select when you know beforehand that there is an odd number of originals. This will save
the time spent on counting the original.
Select this when you know beforehand that there is an even number of originals.
This will save the time spent on counting the original.
2 2-sided: Makes two-sided copies from two-side originals.
2 1-sided: Makes one-sided copies from two-sided originals.
Book 2-sided: Makes two-sided copies from facing pages in a book.
Press to set or cancel the AE (Automatic Exposure) mode.
Press to manually adjust the copy exposure.
Press to enlarge or reduce using a preset copy ratio, or to return the copier to 100% copying (1:1).
Place originals in feeder Flashes when the original in the feeder needs to be reloaded.
Enter frame erase/margin size Flashes when the width of the edges to be erased or the margin needs to be
specified.
* Enter the measurement with the Number keys and then press the OK key.
Replace originals Flashes when the first original copied needs to be replaced with the next one.
Set copy ratio Flashes when the copy ratio needs to be specified.
* Enter the copy ratio with the preset copy ratio key, the reduce/1:1/enlarge
keys, or the Zoom key, and then press the OK key.
Select paper size Flashes when the paper size needs to be specified.
* Select a paper size with the paper select key, and then press the OK key.
Enter original size Flashes when the original size needs to be specified.
* Enter the original size with the Number keys and then press the OK key.
Table 1-401
Figure 1-401
i Check Control Card indicator
o Paper Jam indicator
!0 Add Paper indicator
!1 Replace Toner Cartridge
indicator
!2 Paper Supply/Jam Location
indicator
!3 Paper select key
!4 Select paper size indicator
!5 Copy quantity/copy ratio
display
!6 OK key
!7 Auto Zoom key
!8 Zoom key
!9 % key
@0 Reset key
@1 Stop key
@2 Number keys
@3 Power switch
@4 Start key
@5 Clear key
@6 Interrupt key
Flashes when the original size needs to be selected.
* Select the original size with the paper select key, and then press the OK
key.
Flashes when the copy size needs to be entered.
* Enter the copy size with the Number keys, and then press the Ok key.
Flashes when the control card is not properly inserted.
Flashes when a paper jam occurs.
Flashes when the paper supply in the cassete or stack bypass tray runs out, and when the
cassette is not properly set.
Flashes when the toner runs low and must be replaced with a new one.
Lights to indicate the selected paper cassete or stack bypass. When a paper jam occurs, the location of the paper
jam flashes. It also lights when the Sorter or right door needs to be inspected, or when a paper jam occurs in the
ADF/RDF.
Press to select Auto Paper selection, a paper cassette, or the stack bypass.
The size of the original/copy paper selected with the Paper select key lights.
Displays the entered copy quantity copy ratio, and Additional Functions settings.
Press to confirm items and functions that have been selected when setting modes.
Press to set or cancel the Auto Zoom mode. Auto Zoom automatically selects the appropriate copy ratio, based on
the size of the originals and the selected copy paper.
Press to set or cancel the Zoom mode. Zoom mode allows you to specify a copy ratio from 49 to 204% in 1%
increments. Continue pressing for fast selection.
Press to display the selected copy ratio.
Press to return the settings to standard mode.
Press to stop the coper before copying is completed.
Press the enter copy quantity and other numerical values when setting a mode.
Press to turn the power ON and OFF.
Press to begin copying.
Press to return the copy quantity to one, or to clear an incorrectly entered value when setting a mode.
Press to temporarily stop the current copy job to make priority copies.
Table 1-402
IV. BASIC OPERATION
A. Control Panel
1 23 7 8 9 10 11 15 20 21 22 23
4 5 6 12 13 14 16 17 18 19 24 25 26
2
A
3 · 5····
2 · 4····
2
2
2
2
1 2 3