


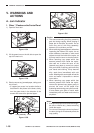
GENERAL DESCRIPTION
COPYRIGHT
©
1998 CANON INC. CANON NP6621 REV.0 FEB. 1998 PRINTED IN JAPAN (IMPRIME AU JAPON)
1–22
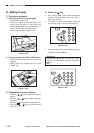
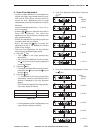
4) Make fine adjustments to the copy ratio in the X
direction.
• Press the Exposure keys (
) to
adjust the copy ratio.
• The initial setting for Zoom Fine Adjustment is
0%.
• If you make a mistake while entering a value,
press the
C
key and then re-enter the value.
5) Press the
OK
key.
• The fine adjustments to the copy ratio in the X
direction are made.
• Then “–2” is displayed in the Copy quantity/
Copy ratio display and the current setting for
the Y direction is displayed in the copy
exposure display.
6) Adjust the copy ratio in the Y direction.
• Press the Exposure keys (
) to
adjust the copy ratio.
• The initial setting for Zoom Fine Adjustment is
0%.
• If you make a mistake while entering a value,
press the
C
key and then re-enter the value.
7) Press the
OK
key.
• The Zoom Fine Adjustment is set and “U03” is
displayed.
• If the
key is pressed before the
OK
key is
pressed, the Zoom Fine Adjustment that was
set is cleared and the copier returns to the
normal copying mode.
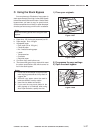
6. Auto Cassette Switching ON/OFF
• Auto Cassette Switching ON/OFF
This function sets Auto Paper Selection and Auto
Cassette Switching for each cassette.
(Auto Paper Switching automatically selects the
appropriate copy paper (cassette) according to
the size of the original and the selected copy ratio.
Auto Cassette Switching automatically supplies
paper from another paper cassette loaded with
the same paper size if the selected paper cassette
runs out during continuous copying.)
Auto Cassette Switching can be set individually
for each cassette.
ON: Cassettes are selected automatically.
OFF: Cassettes are only selected manually.
• The initial setting for Auto Cassette Switching is
ON.
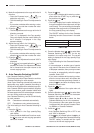
1) Press the
Aditional
Function
key.
• “U01” appears in the Copy quantity/Copy
ratio display.
• Once you set the Additional Functions mode,
the
key turns red and copying operations
cannot be initiated.
2) Press the
4
key.
• If you make a mistake while entering a value,
press either the START key or press the
C
key and then the
4
key.
3) Press the
OK
key.
• The Paper Supply/Jam Location indicator for
the upper cassette of the copier main unit light
continuously. The current setting for the upper
cassette of the copier main unit is displayed in
the Copy quantity/Copy ratio display.
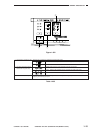
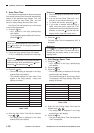
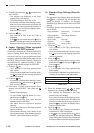
The ON/OFF settings for the Auto Cassette
Switching function are as shown in the table
below.
Table 1-408
4) Press the Number keys (
1
,
0
) to select Auto
Cassette Switching ON or OFF for the top
cassette in the copier main unit. The current
setting is displayed in the Copy quantity/Copy
ratio display.
• The initial setting for Auto Cassette Selection
is ON.
• If coloured paper or another type of special
copy stock of the same size is loaded in one
of the paper cassettes, then you may not want
the copier to automatically switch the paper
cassette. Select OFF.
• If you make a mistake while entering a value,
enter the correct value and it will replace the
incorrect one that was previously entered, or
press the
C
key and after the display clears,
enter the correct value.
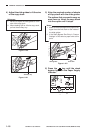
5) Press the
key.
• The bottom cassette of the copier main unit
lights.
6) Press the Number keys (
1
,
0
) to select Auto
Cassette Switching ON or OFF for the bottom
cassette in the copier main unit.
• Repeat steps ➎ and ➏ to select the Auto
Cassette Switching for all of the cassettes.
• This procedure is the same when the copier
is equipped with the optional Cassette Feed-
ing Module or Cassette Pedestal.
7) Press the
OK
key.
• Auto Cassette Switching ON or OFF is set
and “U04” is displayed.
• If the
key is pressed before the
OK
key is
pressed, the changed Auto Cassette Switching
ON/OFF setting is cleared and the copier
returns to the normal copying mode.
Auto Cassette Switching
ON
OFF
Settings
–1
–0