


AT-TQ2403 Management Software User's Guide 101
Configuring the Guest Interface
To configure the Guest interface on the AT-TQ2403 Management Software, perform these
configuration steps:
1. Configure the access point to represent two virtually separate networks as described in the
section below, “Configuring a Guest Network on a Virtual LAN
”.
2. Set up the guest Welcome screen for the guest captive portal as described in the section below,
“Configuring the Welcome Screen (Captive Portal)
”.
Note: Guest Interface settings are not shared among access points across the cluster.
These settings must be configured individually on the Administration pages for each access
point. To get to the Administration pages for an access point that is a member of the
current cluster, click on its IP Address link on the Cluster > Access Points page of the
current AP. For more information about which settings are shared by the cluster and which
are not, see “Which Settings are Shared as Part of the Cluster Configuration and Which
Are Not?”.
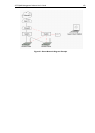
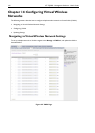
Configuring a Guest Network on a Virtual LAN
Note: If you want to configure the Guest and Internal networks on Virtual LAN (VLANs),
the switch and DHCP server you are using must support VLANs.
As a prerequisite step, configure a port on the switch for handling VLAN tagged packets
as described in the IEEE 802.1Q standard.
Guest Welcome Screen settings are shared among access points across the cluster. When
you update these settings for one access point, the configuration will be shared with the
other access points in the cluster. For more information about which settings are shared by
the cluster and which are not, see “Which Settings are Shared as Part of the Cluster
Configuration and Which Are Not?”.
To configure Internal and Guest networks on Virtual LANs, do the following:
1. Use only one wired connection from the network port on the access point to the LAN. (Make sure
this port is configured to handle VLAN tagged packets.)
2. Configure Ethernet (wired) Settings for Internal and Guest networks on VLANs as described in the
sections in “Setting the Ethernet (Wired) Interface
”.
(Start by enabling Guest Access and choosing "For Internal and Guest access, use two: VLANs" as
described in “Enabling or Disabling Guest Access and Choosing a Virtual Network
”.)
3. Provide the radio interface settings and network names (SSIDs) for both Internal and Guest
networks as described in “Setting the Wireless Interface
”.
4. Configure the guest splash screen as described in “Configuring the Guest Interface
”.
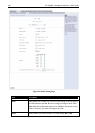
Configuring the Welcome Screen (Captive Portal)
You can set up or modify the Welcome screen guest clients see when they open a Web browser or try
to browse the Web. To set up the captive portal, do the following.