


102 AT-TQ2403 - Management Software - User's Guide
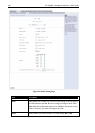
1. Navigate to the Manage > Guest Login tab.
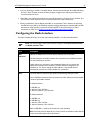
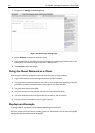
Figure 40: Guest Login Setting Page
2. Choose Enabled to activate the Welcome screen.
3. In the Welcome Screen Text field, type the text message you would like guest clients to see on the
captive portal. The maximum length of this text is 1,000 characters.
4. Click Update to apply the changes.
Using the Guest Network as a Client
Once the guest network is configured, a client can access the guest network as follows:
1. A guest client enters an area of coverage and scans for wireless networks.
2. The guest network advertises itself via a Guest SSID or some similar name, depending on how the
guest SSID is specified in the Administration Web pages for the Guest interface.
3. The guest client chooses Guest SSID.
4. The guest client starts a Web browser and receives a Guest Welcome screen.
5. The Guest Welcome Screen provides a button for the client to click to continue.
6. The guest client is now enabled to use the “guest” network
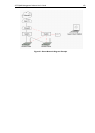
Deployment Example
In the figure below, the dotted red lines indicate dedicated guest connections.
All access points and all connections (including guests) are administered from the same AT-TQ2403
Management Software Administration Web pages.