


168 AT-TQ2403 - Management Software - User's Guide
1. Configure the following settings on the Association and Authentication tabs on the Network
Properties dialog.
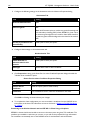
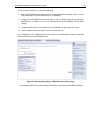
Association Tab
Field Setting
Network Authentication WPA
Data Encryption TKIP or AES depending on how this option is configured on the
access point.
Note: When the Cipher Suite on the access point is set to "Both",
then TKIP clients with a valid TKIP key and AES clients with a valid
CCMP (AES) key can associate with the access point.
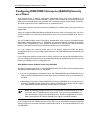
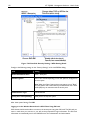
2. Configure this setting on the Authentication tab.
Authentication Tab
Field Setting
EAP Type Choose “Protected EAP (PEAP)”
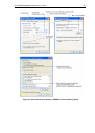
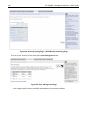
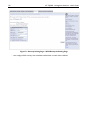
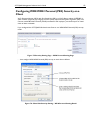
3. Click Properties to bring up the Protected EAP Properties dialog and configure the following
settings.
Smart Card or other Certificate Properties Dialog
Field Setting
Validate Server
Certificate
Disable this option (click to uncheck the box).
Note: This example assumes you are using the Built-in Authentication
server on the AP. If you are setting up EAP/PEAP on a client of an AP that
is using an external RADIUS server, you might certificate validation and
choose a certificate, depending on your infrastructure.
Select Authentication
Method
Choose "Secured password (EAP-MSCHAP v2)"
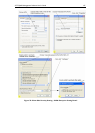
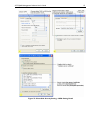
4. Click Configure to bring up the EAP MSCHAP v2 Properties dialog.
On this dialog, disable (click to uncheck) the option to "Automatically use my Windows login name
. . ." etc. so that upon login you will be prompted for user name and password.
Click OK on all dialogs (starting with the EAP MSCHAP v2 Properties dialog) to close and save
your changes.
Logging on to the Wireless Network with a WPA PEAP Client
"WPA/WPA2
Enterprise (RADIUS)" PEAP clients should now be able to associate with the access point.
Client users will be prompted for a user name and password to authenticate with the network.