


42 AT-TQ2403 - Management Software - User's Guide
A user with an account that is enabled can log on to the wireless access points in your network as a client.
Disabling a User Account
To disable a user account, click the checkbox next to the username and click Disable.
A user with an account that is disabled cannot log on to the wireless access points in your network as a
client. However, the user remains in the database and can be enabled later as needed.
Removing a User Account
To remove a user account, click the checkbox next to the username and click Remove.
If you think you might want to add this user back in at a later date, you might consider disabling the user
rather than removing the account altogether.
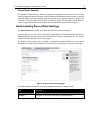
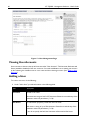
Backing Up and Restoring a User Database
You can save a copy of the current set of user accounts to a backup configuration file. The backup file can
be used at a later date to restore the user accounts on the AP to the previously saved configuration.
Backing Up the User Database
To create a backup copy of the user accounts for this access point:
1. Click the backup or restore the user database link.
A File Download or Open dialog is displayed.
2. Choose the Save option on this first dialog.
This brings up a file browser.
3. Use the file browser to navigate to the directory where you want to save the file, and click OK to
save the file.
You can keep the default file name (wirelessUsers.ubk) or rename the backup file, but be sure to
save the file with a .ubk extension.
Restoring a User Database from a Backup File
To restore a user database from a backup file:
1. Select the backup configuration file you want to use, either by typing the full path and file name in
the Restore field or click Browse and select the file.
(Only those files that were created with the User Database Backup function and saved as .ubk
backup configuration files are valid to use with Restore; for example, wirelessUsers.ubk.)
2. Click the Restore button.
When the backup restore process is complete, a message is shown to indicate that the user
database has been successfully restored. (This process is not time-consuming; the restore should
complete almost immediately.)
3. Click the User Management tab to see the restored user accounts.