


Chapter 9: Security Management
237
Security Banner
KX II provides you with the ability to add a security banner to the KX II
login process. This feature requires users to either accept or decline a
security agreement before they can access the KX II. The information
provided in a security banner will be displayed in a Restricted Service
Agreement dialog after users access KX II using their login credentials.
The security banner heading and wording can be customized, or the
default text can be used. Additionally, the security banner can be
configured to require that a user accepts the security agreement before
they are able to access the KX II or it can just be displayed following the
login process. If the accept or decline feature is enabled, the user's
selection is logged in the audit log.
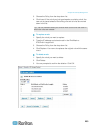
To configure a security banner:
1. Click Security > Banner to open the Banner page.
2. Select Display Restricted Service Banner to enable the feature.
3. If you want to require users to acknowledge the banner prior to
continuing the login process, select Require Acceptance of
Restricted Service Banner. In order to acknowledge the banner,
users will select a checkbox. If you do not enable this setting, the
security banner will only be displayed after the user logs in and will
not require users acknowledge it.
4. If needed, change the banner title. This information will be displayed
to users as part of the banner. Up to 64 characters can be used.
5. Edit the information in the Restricted Services Banner Message text
box. Up to 6000 characters can be entered or uploaded from a text
file. To do this, do one of the following:
a. Edit the text by manually typing in the text box. Click OK.
b. Upload the information from .txt file by selecting the Restricted
Services Banner File radio button and using the Browse feature
to locate and upload the file. Click OK. Once the file is uploaded,
the text from the file will appear in the Restricted Services
Banner Message text box.