


17
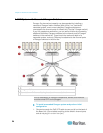
This chapter includes full instructions for how to rack-mount Paragon II
devices, install a single Paragon switch, cascades of multiple Paragon
switches, Stacking Units and other devices.
In This Chapter
Rack-Mounting ........................................................................................17
A KVM System with A Single Paragon Sw
itch........................................19
A KVM System with Cascaded Paragon Switches .................................24
Ins
talling a P2-UMT832S Stack
ing Unit ..................................................29
Installing a P2-UMT1664S Stacking Uni
t ................................................30
Installation of the HubPac........................................................................
31
Using the OSUI for Initial Configuration ..................................................36
Rack-Mounting
Paragon II user stations and most KVM switches can be mounted in 1U
(1.75", 4.4 cm) of vertical space in a standard 19" equipment rack,
except that P2-UMT1664M switch shall be mounted in 2U (3.5", 8.9 cm)
of space. To rack-mount a Paragon switch, use the brackets and screws
that came with the device. To rack-mount a user station, use Raritan's
RUST-LM304 rackmount kit. You can mount a Paragon switch or user
station facing the front of the rack or facing the rear.
Note: If you lose or damage a switch's brackets, replace them with the
RUMT-1U-LM304 kit for any 1U switch or RUMT-2U-LM304 for a
P2-UMT1664M.
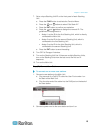
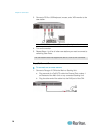
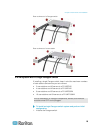
Forward Mount
The steps correspond to the numbers shown in the front rackmount
diagrams.
1. Secure the cable-support bar to the back end of the side brackets
using two of the included screws.
2. Slide the user station or KVM switch between the side brackets, with
its rear panel facing the cable-support bar, until its front panel is flush
with the “ears” of the side brackets.
3. Secure the user station or switch to the side brackets using the
remaining included screws (three on each side).
4. Mount the entire assembly in your rack and secure the side brackets'
ears to the rack's front rails with your own screws, bolts, cage nuts,
and so on.
5. When connecting cables to the rear panel of the user station or
switch, drape them over the cable-support bar.
Chapter 3
Rackmount and Installation