


NetWare 4.x, 5 - Advanced Settings
39
3
ery mode, use the NIB Setup Tool Wizard.
⇒
P.29
“Quick Setup Using the NIB
Setup Tool Wizard”
A
Log in to the file server as an Admin or an Admin equivalent.
B
Run the NIB Setup Tool.
Reference
“Running the NIB Setup Tool”
⇒
P.28.
C
Click
[
Property Sheet
]
and click
[
OK
]
.
The Browse dialog of the Network Interface Board appears.
D
Click
[
IPX protocol
]
.
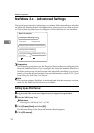
E
Select the IPX address of the Network Interface Board which is to be con-
figured by clicking it, and click
[
Next >
]
.
Note
❒
If you don't know which Network Interface Board you are configuring,
print the Configuration Page using the printer's operation panel, and select
the MAC address that is on the page.
F
Confirm that the MAC and IPX addresses are correct, and click
[
Finish
]
.
[
NIB Setup Tool
]
window appears.
G
Click
[
Configure
]
.
The property sheet appears.
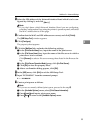
H
Click the
[
NetWare
]
tab, and make the following settings.
A
In the
[
Print Server Name
]
box, input the name of the print server.
B
In the
[
File Server Name
]
box, input the name of the file server in which a
print server is to be created.
Clicking
[
Browse
]
, you can select a file server among those listed in the
Browse dialog.
C
In the
[
NDS Context
]
box, input the context in which the print server is to
be created.
Clicking
[
Browse
]
, you can select a context among those listed in the
Browse dialog.
Note
❒
Object names must be input from a lower level and divided by a period.
For example, if you want to create a file server into NETWORK under
DS, input “NETWORK. DS”.
D
In the
[
Print Server Operation Mode
]
group, click
[
As Print Server
]
.
E
Click
[
OK
]
to close the property sheet.
F
After a confirmation dialog appears, click
[
OK
]
.