1780R-Series Service Manual
5–1
Adjustment Procedures
This section of the 1780R-Series Service Manual consists of an Adjustment
Procedure. The Performance Verification is used to evaluate operation of the
instrument as specified in the Performance Requirements in Specifications. The
Adjustment Procedure is used to return the instrument to operate within its
Performance Requirements.
Prior to attempting recalibration, use the Performance Check Procedure to check
the instrument. Special note should be taken of steps where Performance
Requirements are not met. Only partial re-adjustment may be required to return
the instrument to operate within its Performance Requirements. If any adjust-
ments are made, the Performance Check Procedure should be followed once
again to ensure that all Performance Requirements are met.
In this procedure, names of 1780R-Series front- and rear-panel controls and
connectors are fully capitalized (e.g., VERT POS). Control and connector names
on test equipment and internal 1780R-Series adjustments are initial capitalized
(e.g., Time/Div. Geometry, etc.).
Limits, tolerances, and waveforms in this section are guides to adjustments and
checks. They are not instrument specifications unless listed in the Performance
Requirements column of the Specifications in Section 1.
General Information
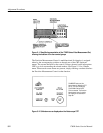
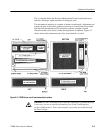
The 1780R-Series front-panel controls fall into four groups:
1. Display controls, which are located beneath the CRTs and are assigned to
their respective CRT by the lighted push-button switch directly below the
CRT.
2. Menu selection switches located on left side of the CRT bezel assembly.
Where the menus selected by these switches are displayed is also a function
of the lighted push-button switches in the Display control group.
3. Precision Measurement switches and control (large knob) on the right side of
the CRT bezel assembly.
4. Functional Measurement controls, on the right front panel. Figure 5–1 shows
the location of these control groups.


