


192 Configuring System Information
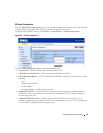
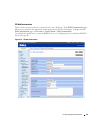
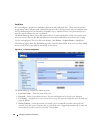
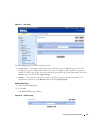
Figure 6-73. CP Web Customization (cont.)
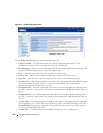
The CP Web Customization page contains the following fields:
•
Captive Portal ID
— The drop-down menu lists each CP configured on the switch. To view
information about the clients connected to the CP, select it from the list.
•
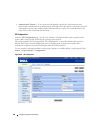
Branding Image
— Select the name of the image file to display on the top left corner of the page. This
image is used for branding purposes, such as the company logo.
•
Fonts
— Enter the name of the font to use for all text on the CP page.
•
Browser Title
— Enter the text to display on the client’s Web browser title bar or tab.
•
Page Title
— Enter the text to use as the page title. This is the text that identifies the page.
•
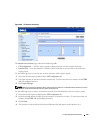
Separator Color
— Enter the hexadecimal color code to use as the separator above and below the login
area and acceptance use policy. Press the ... button for a color pick list. The sample account
information is updated with the colors you choose.
•
Foreground Color
— Enter the hexadecimal color code to use as the foreground color in the login area.
Press the ... button for a color pick list. The sample account information is updated with the colors you
choose.
•
Background Color
— Enter the hexadecimal color code to as the background color in the login area.
Press the ... button for a color pick list. The sample account information is updated with the colors you
choose.
•
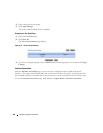
Account Image
— Select the image that will display on the Captive Portal page above the login field.
The image display area is 55H X 310W pixels. Your image will be resized to fit the display area. Click
Download Image
, then browse to and select an image on your local system (or accessible from your
local system) to download to the switch.
•
Account Title
— Enter the summary text to display that instructs users to authenticate.