


Configuring Rights
b.
If the protocol requires a destination port, type it into the Port field. If the protocol does not
support port specifications,
N/A appears in the port field. You can enter a single port, or use
an asterisk (*) to specify all ports.
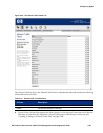
You can access a list of ports by clicking the View button ( ) at the right of the
Port field.
This displays in a separate pop-up window a list of ports for common destinations such as
the Stop pages or the Logon pages.
c. If you want to specify a destination IP address, type it in the Address field. The address field
can be:
—A single IP address
— A network address (IP address plus netmask)
— An asterisk (*) for any IP address
— A built-in or user-defined Address variable
An address can be preceded by a “
!” or “not” followed by a space to negate the address.
For example:
not @INTERNAL@.
You can access the list of built-in address variables by clicking the View button ( ) at the
right of the
Address field.
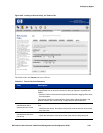
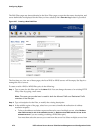
Step 4. To use a tcpdump expression to specify a filter, select the Capture traffic via a custom filter radio
button, and type the appropriate expression into the text box. See Appendix B, “Filter Expression
Syntax” for details of the tcpdump syntax.
You can create more complex filters using a tcpdump expression. For example, to allow all traffic
except to subnets 10.0.0.0/8 and 20.0.0.0/8, you could enter the tcpdump string:
(not dst net 10.0.0.0/8) and (not dst net 20.0.0.0/8)
Note: Tcpdump syntax is case sensitive. All keywords must be in lower-case to be recognized.
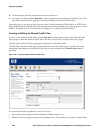
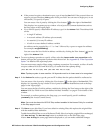
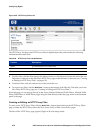
Step 5. In the Redirect To section, type the port and IP Address that the packet should be redirected to.
You can access a list of ports by clicking the View button ( ) at the right of the
Port field. This
displays in a separate pop-up window a list of ports for common destinations such as the Stop
pages or the Logon pages.
You can access the list of built-in address variables by clicking the View button at the right of the
Address field. See “Built-in and User-defined Address Variables” on page 4-70 for details of this
window.
For example, to redirect packets to the Stop page, you would specify port 81 at address
@INTERNAL@ (the Access Control Server).
Note: You must also have the ACS-AC Stop redirect enabled in the Access Policy for a redirect
to the Stop page to work.
Step 6. Click Save to save this filter. If you have edited an existing filter, this replaces the original filter
with the modified filter definition.
To add the modified filter as a new Redirected Traffic filter, leaving the original filter unchanged,
click
Save As Copy. The Save As Copy button is available only on the Edit Filter page.
After a
Save As Copy the same page remains displayed so you can make additional changes.
HP ProCurve Secure Access 700wl Series Management and Configuration Guide 4-69