


Configuring Rights
Connection Profiles once the Access Controllers have been installed and the appropriate
Locations have been created.
b. Create Time Windows that specify hours of the day, days of the week, and so on, to allow or
restrict access during specified times.
For example, if you have temporary workers, or you allow guests, do you want to limit
their access to normal working hours during the work week? Do you want to limit access
during a particular period, such as during examinations? You can use Time Windows to
define Connection Profiles that allow access only during the specified times.
You create your Connection Profiles by selecting from among the Locations and Time Windows
that have been defined, or accepting the defaults. In addition, you can specify a VLAN tag to be
used in matching clients to the Connection Profile. This allows you to distinguish between
different groups of clients for the purposes of authentication or access rights, even though they
connect through the same physical locations. You can specify that a client matches the Connection
Profile only if it uses a specific VLAN tag, or if it does not use a VLAN tag (i.e. is excluded if it
does use a VLAN tag). The default is that it matches with any VLAN tag.
As part of defining a Connection Profile you also specify how clients that match that Connection
Profile should be authenticated. You can select an Authentication Policy individually for each
Connection Profile. In addition, you can specify the logon page that should be used (either the
standard logon page or a custom one) for clients that are presented with a logon page through
their browser. See
Chapter 5, “Configuring Authentication” for details about configuring
Authentication Policies and customized Logon pages.
Step 3. Create Access Policies that define the sets of access rights you want to grant based on a client’s
Identity and Connection Profile.
You can create as many Access Policies as you want. Each row in the Rights Assignment Table
can have a different Access Policy, meaning you can create a different policy for every
combination of Identity and Connection Profiles, if you want.
Each Access Policy is a collection of settings that include traffic filters for controlling which
packets are allowed into the network, HTTP filters that determine web sites are accessible or
restricted, as well as settings that specify whether encryption is required and of what type, and
how IP addressing should be handled.
• Create Allowed Traffic Filters and Redirected Traffic Filters as appropriate to allow or restrict access
to resources and destinations in your network. A number of filters for common traffic patterns
are predefined, but you may find it necessary to create additional filters to meet your unique
needs.
Create your Access Policies by selecting from among the traffic filters that have been defined,
and by specifying other settings, such as encryption options, rights timeout values, HTTP proxy
filtering, and others.
Step 4. Add rows to the Rights Assignment Table by combining the Identity Profiles, Connection Profiles,
and Access Policies you’ve created. The order of these rows in the table is important, as
whenever the 700wl Series system looks for a match it searches the table row by row starting
from the top, and stops when it find the first match.
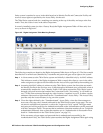
The Rights Assignment Table
The Rights Assignment Table is where Identity Profiles, Connection Profiles, and Access Policies come
together to define the access rights granted to individual clients. Every client that connects to the 700wl
4-6 HP ProCurve Secure Access 700wl Series Management and Configuration Guide