


Configuring Rights
The fields on this page are as follows:
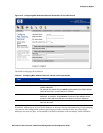
Table 4-5. New Network Equipment Fields
Field Description
Name A descriptive name for the device. This name may be up to 32 characters in length.
Any 7-bit characters are allowed.
MAC Address The MAC address of the network device.
A MAC address can be entered with colons (:) or dashes (-) separating the tuples,
or without any separation. Thus, 00:01:a2:b3:4c:d5, 00-01-a2-b3-4c-d5,
and 0001a2b34cd5 are all valid formats for a MAC address.
A MAC address can be entered with colons (:) or dashes (-) separating the tuples,
or without any separation. Thus, 00:01:a2:b3:4c:d5, 00-01-a2-b3-4c-d5,
and 0001a2b34cd5 are all valid formats for a MAC address.
You can also use the wildcard character —*“ (asterisk) as the last character to create
a wildcard MAC address. The asterisk can replace any number of digits or tuples
(including all), but must always be the last character in the address. For example,
the following are valid wildcard MAC addresses:
00:05:A3:16:00:*
00:05:A3:16:0*
00:05:A3:*
0005A3*
*
The wildcard character cannot be used in the middle of the string:
00:05:A3:*:00:02 is not a valid wildcard MAC address.
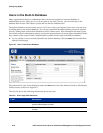
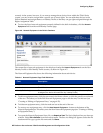
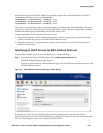
To create a new Network Equipment entry, do the following:
Step 1. Enter the identifying information about this equipment as defined in Table 4-3 above.
Note: If you use wildcard MAC addresses, you must take care to ensure that the MAC address
range you define does not include the MAC addresses of clients that you want to authenticate
(i.e. to logon using a username and password). If a client‘s MAC address is recognized as
matching within the MAC address range, that client will bypass the authentication process and
will not have the opportunity to log on and provide a username. That client will then not match
an Identity Profile based on its username, but rather will receive rights based on its MAC
address.
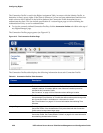
Step 2. Select the Identity Profile to which this network equipment should be assigned by clicking the
appropriate checkbox in the Identity Profiles table.
Assign network equipment to only one Identity Profile, since the search for a match always stops
at the first match found.
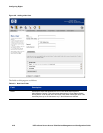
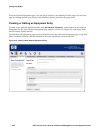
You can edit an Identity Profile by clicking its name or the pencil icon at the end of the row. To
create a new Identity Profile, click the New
Identity Profile... button at the bottom of the Identity
Profiles table.
Step 3. Click Save to save this Network Equipment entry.
Cancel returns you to the previous page without saving any changes.
HP ProCurve Secure Access 700wl Series Management and Configuration Guide 4-23