


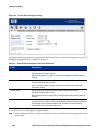

Configuring Rights
Note: It is important that rows with the —Access Points“ Identity Profile appear in the table
before rows that contain the —Any“ Identity Profile. Otherwise, the MAC address would match
—Any“ first, and would never get to the row with the —Access Points“ Identity Profile.
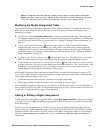
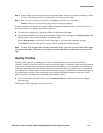
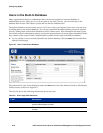
Modifying the Rights Assignment Table
You can add new rows to the Rights Assignment Table, delete rows from it, or modify the rows in the
table. You can also reorder the rows in the table to create the right precedence relationships when
searching for a match.
» To add a row, click the New Rights Assignment... button at the bottom of the page. This displays the
New Rights Assignment page, where you can select from among the existing Identity, Connection and
Access Policies to define a new row for the table. See
“Adding or Editing a Rights Assignment” on
page 4-9.
» To edit a row, click the Pencil icon at the far right of the row. This displays the Edit Rights
Assignment page, where you can change any of the profiles used in the row by selecting from the
existing Identity, Connection and Access Policies. This page is almost identical to the New Rights
Assignment page, except that the current profile selections are displayed. See
“Adding or Editing a
Rights Assignment” on page 4-9.
» To delete a row, click the trash can icon at the far right of the row. This deletes the row from the
table. A window appears giving you the opportunity to confirm or cancel the delete operation.
» To reorder the rows in the table, use the up/down buttons at the left of each row to move rows up
or down in the table. The only row that cannot be moved is the bottom row. This “Any Identity—Any
Connection—Unauthenticated Access” combination must always be left as the “fall-through” or
default match for clients that do not match any other profile.
If the Rights Assignment Table contains more than 25 rows, the table will be displayed in pages of 25
rows. A set of page navigation controls are displayed at below the bottom right corner of the table. You
can navigate among the pages in two ways:
• Use the forward and backward arrow buttons to view pages sequentially
• Select a page number from the drop-down list to go directly to a specific page
From the Rights Assignment Table you can also edit any of the Identity Profiles, Connection Profiles, or
Access Policies shown in the table. To edit an individual profile or policy, click the name of the item you
want to edit. The appropriate Edit page will be displayed.
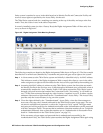
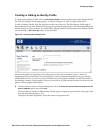
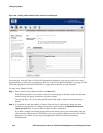
Adding or Editing a Rights Assignment
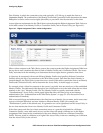
To add a new row to the Rights Assignment Table, click the New Rights Assignment... button at the bottom
of the table. The New Rights Assignment page appears, as shown in Figure 4-3, with the first three drop-
down fields empty.
To edit a row, click the pencil icon at the end of the row. The Edit Rights Assignment page looks very
similar to the New Rights Assignment page, but the fields are already filled in with the Identity Profile,
Connection Profile, Access Policy, and row position of the Rights Assignment Table row to be edited. In
addition, a
Save As Copy button enables you to save a modified row definition without changing the
original row.
HP ProCurve Secure Access 700wl Series Management and Configuration Guide 4-9