


Configuring Rights
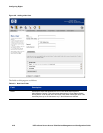
Step 2.
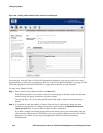
Specify where in the table the new row should be placed. Order is important in matching a client
to a row. The default position is to place the row at the top of the table.
Step 3. When you have made your selections, click Save to add this row to the table.
Cancel returns you to the previous page without saving any changes.
To edit an existing row, modify any of these fields to change the Identity Profile, Connection Profile, or
the Access Policy, or to change the position of the row.
» To replace the original row with the modified row definition, click Save.
» To add the modified row as a new row, leaving the original row unchanged, click Save As Copy. (This
button appears only on the Edit Rights Assignment page.)
After a
Save As Copy you will stay on the same page so you can make additional changes.
Click
Cancel to return to the previous page without making any further changes.
Note: To have your changes affect currently connected clients, you must go to the Client Status page
and refresh user rights. Otherwise, any changes you make take effect the next time a client gets new
rights.
Identity Profiles
Identity Profiles represent named groups of users or equipment that have some characteristic in
common—usually a common need for a certain set of access rights. An Identity Profile can be populated
with user or network equipment entries from the built-in database, or it can represent an external group
or domain. In the latter case, the Identity Profile does not need to have any specific Users or equipment
associated with it. Instead, when a client is authenticated, a group or domain name is returned as part of
the authentication process. If the returned group or domain information matches an Identity Profile
name, the client is considered to be matched to that Identity Profile.
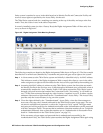
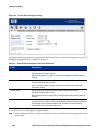
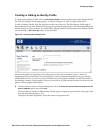
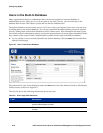
» To view the current Identity Profiles, click the Identity Profiles tab visible at the top of any Rights
Manager page.
The Identity Profiles page appears (see Figure 4-4).
HP ProCurve Secure Access 700wl Series Management and Configuration Guide 4-11