


5 Press to select a photo.
6 Press .
7 Press to select Edit Photo.
From here You can
Brightness Adjust the brightness of a photo.
Rotate Rotate a photo in 90-degree increments clockwise or counterclockwise.
Crop Crop a photo.
Auto Enhance Enhance a photo automatically.
Remove Red Eye Reduce the red-eye effect caused by light reflection.
Colorized Effect Select whether to print a photo in black and white, sepia, antique brown, or
antique gray. These effects can make photos appear old or antique.
Frames Select a frame for the photo.
Cropping a photo
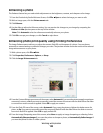
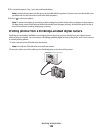
1 From the Productivity Studio Welcome Screen, click File Open to select the image you want to edit.
2 With an image open, click Crop Photo on the Quick Fixes tab.
3 Click and drag with your mouse to select the section of the image that you want to crop. You can adjust the
cropped area by using your mouse and dragging the lines to increase or decrease the cropped area.
4 Click Crop Now.
5 The cropped portion of the original image displays in the Preview pane. You can save the cropped image.
Rotating a photo
1 From the Productivity Studio Welcome Screen, click File Open to select the image you want to edit.
2 With an image open, click the Quick Fixes tab.
3 Click Rotate Left or Rotate Right to rotate the image 90 degrees in either direction.
The thumbnail of the photo is updated.
Changing the Resolution / Size of a photo
Resolution refers to dpi (dots per inch).
1 From the Productivity Studio Welcome Screen, click File Open to select the image you want to edit.
2 With the image open, click the Advanced tab.
3 Click Image Resolution / Size.
Working with photos
121