


3 From the “I Want To” menu, click Adjust speed dial list and other fax settings.
4 Click the Ringing and Answering tab.
5 From the “Automatically answer incoming calls as a fax” area, select On from the Auto Answer drop-down list.
6 To turn the Auto Answer feature on and off at scheduled times, select the settings you want from the drop-down
lists.
7 To set the number of telephone rings before the printer automatically receives faxes, select a setting from the
“Pick-up on the” drop-down list in the “Answering on your phone line type” area.
8 Click OK to save the settings.
Setting a fax manual answer code
1 From the desktop, double-click the Productivity Studio icon.
2 From the Settings area of the Welcome Screen, click Fax History and Settings.
3 From the “I Want To” menu, click Adjust speed dial list and other fax settings.
4 Click the Ringing and Answering tab.
5 From the “Answering on your phone line type” area, enter the code you want to use.
Note: The code can include up to seven numbers, commas, periods, spaces, and/or these symbols: * # + - ( ).
6 Click OK to save the setting.
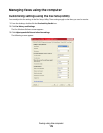
Using Caller ID from the software
Caller ID is a service provided by some telephone companies that identifies the telephone number or the name of
the person who is calling. If you subscribe to this service, it works with the printer. When you receive a fax, the
telephone number or name of the person who is sending you the fax appears on the display.
Notes:
• Caller ID is available only in some countries and regions.
• The number of patterns is defined by the country or region setting and only the number of patterns defined for
the selected country or region is shown.
The printer supports two distinct Caller ID patterns: Pattern 1 (FSK) and Pattern 2 (DTMF). Depending on the country
or region you live in and the telecommunications company you subscribe to, you may need to switch the pattern to
display Caller ID information.
1 From the desktop, double-click the Productivity Studio icon.
2 From the Settings area of the Welcome Screen, click Fax History and Settings.
3 From the “I Want To” menu, click Adjust speed dial list and other fax settings.
4 Click the Ringing and Answering tab.
5 From the “Answering on your phone line type” section, select the pattern number you want from the “Caller ID
pattern” drop-down list.
6 Click OK to save the setting.
Faxing using the computer
171