


22 Click Start.
23 Click Programs or All Programs Lexmark 9500 Series.
24 Click Wireless Configuration Utility.
Note: You may be prompted to connect the printer to the computer again using the installation cable as part
of the setup process.
25 Follow the prompts on the computer screen.
26 Store a copy of your network name and security code in a safe place for future reference.
Adding a printer to an existing ad hoc wireless network using
Windows
1 Do one of the following:
• In Windows Vista, click .
• In Windows XP, click Start.
2 Click Programs or All Programs Lexmark 9500 Series.
3 Click Wireless Configuration Utility.
4 Follow the instructions on the computer screen.
Switching between connections
The printer supports switching between different types of connections, which include the following:
• Switching between a wireless network connection and a wired (Ethernet) network connection
• Switching between a USB connection and a wireless network connection
• Switching between a USB connection and a wired (Ethernet) network connection
Note: When switching between connections, make sure that the computer stays on the same network as your printer.
Switching between a wireless network connection and a wired
(Ethernet) network connection
Switching from a wireless connection to a wired (Ethernet) connection
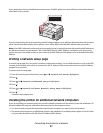
1 Insert one end of the Ethernet cable into the Ethernet port of the printer.
2 Insert the other end of the Ethernet cable into an available Ethernet port on your router.
3 Wait 30 to 40 seconds for the internal print server to detect the wired network settings.
Your wireless network settings will be disabled when the wired network settings become active.
4 Print a test page to test the communication between the computer and the printer. For more information, see
“Printing a test page” on page 217.
Connecting the printer to a network
64