


1152700 • Issue 1 • February 2001 • Section 2 Operation and Maintenance
Page 2-100
2000, ADC Telecommunications, Inc.
DLP-712
Page 2 of 8
4. A status window pops up stating that the NMIC is verifying the RNE slot is configured as a
SEPI (Shelf Expansion Interface), and to please wait. If the slot is not configured as a SEPI,
another pop up window appears prompting the user to select another slot. If this happens,
verify slot configuration on the shelf and change if necessary, or select another slot,
otherwise continue.
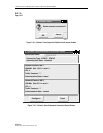
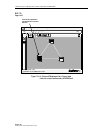
5. The Add EPS NE - Connect to Ring window appears. Refer to Figure 712-6. Verify that the
STN-EPS shelf has physically been connected to the ring node and select Next>>.
6. The Add EPS NE - Wait for Boot-up window appears. Refer to Figure 712-7. The STN-
EPS generally boots up within five minutes if it is properly connected to the ring node. At
this time the user may abort the task by selecting Cancel. If the boot-up exceeds five
minutes, the Add NE Boot Time Exceeded window appears. Refer to Figure 712-8. Follow
the instructions and select either Quit or Retry. If Quit is selected, the Add NE - Reconnect
Cables window appears. Refer to Figure 712-9. Follow the instructions to return the
equipment to its original physical state and select OK.
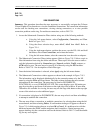
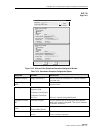
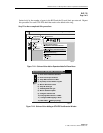
7. After the EPS boots successfully, there may be several popup windows that appear briefly
asking the user to wait while processing. The system verifies the shelf and interface type
during this process. The Configure Software – Network Elements window appears for task
number 9, displaying the cards equipped in each slot of the shelf, and the current running
software versions. Refer to Figure 712-10. Software installation is recommended but not
necessary. Select Skip SW Installation and go to step 12. To install the software, continue.
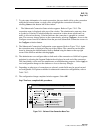
8. To install software for each card type in the shelf (except SC), select and hold the right
mouse button on the row of the card. A pop-up window appears displaying any images that
are stored on the NMIC for the card.
9. Select a software version displayed in the pop-up window and release the mouse button.
The version is now listed in the Selected Software Image column on the right.
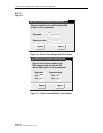
10. Repeat the software image selection for each card. Once all new images have been chosen,
select Apply. Selecting Apply before choosing software images brings up the instructional
window shown in Figure 712-11. Selecting the Clear Selected button will reset all selected
software images leaving the second column from the right blank. Refresh can be selected
periodically to update all information in the window. Selecting Skip will close the window
and no software versions will be changed.
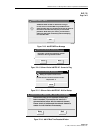
11. Once the software images have been selected for download, a confirmation pop-up window
appears. Refer to Figure 712-12. Select OK to continue adding an EPS NE. Once completed
the Continue button becomes selectable. Select the Continue button.
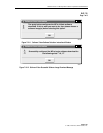
12. A message window appears stating that the EPS shelf has successfully been added to the
network and to wait while the system updates its topology. Once completed, the GUI screen
will change the NE icon to reflect a primary node with expansions. Refer to Figure 712-13.
The number of secondary STN-EPS shelves that may be linked to a primary ring node is