


1152700 • Issue 1 • February 2001 • Section 2 Operations and Maintenance
Page 2-287
© 2000, ADC Telecommunications, Inc.
DLP-765
Page 1 of 3
CONFIGURE CARD PROTECTION GROUPS
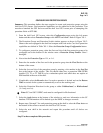
Summary: This procedure defines the steps required to create card protection groups using the
shelf level GUI screens. Card protection capabilities are also addressed in this procedure. User
must have launched the GUI and accessed the shelf level GUI screen prior to attempting this
procedure. Refer to NTP-006.
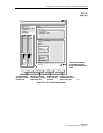
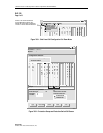
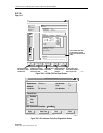
1. From the shelf level GUI screen, select the Configuration menu using the left mouse
button and then select Protection Groups or hit ALT+N and Alt+P. Refer to Figure 765-1.
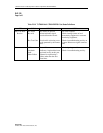
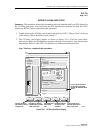
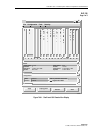
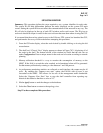
2. The Protection Groups and Protection Switch window appears as shown in Figure 765-2.
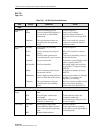
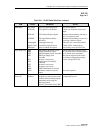
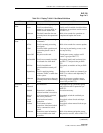
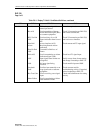
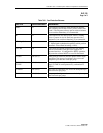
Observe the cards equipped in the shelf and compare with work order. Card level protection
capabilities are defined in Table 765-1. Select the Protection Group Configuration button.
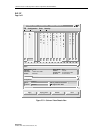
3. To configure a protection group, select the first card slot of the first protection group to be
configured and at the bottom of the window enter a Protection Group Number value 1
through 8.
4. Next select the Protection Type as 1:N, or 1+1.
5. Enter the slot number of the first card in the protection group into the First Slot box at the
bottom of the screen.
6. Select the last card slot of the protection group by entering a slot number in the Last Slot
box at the bottom of the window. This slot should either have a protection EIM (PEIM)
installed (T1, T3, or T3 TMUX) or be a redundant optical card which does not require an
EIM installed at the rear of the shelf.
5. If applicable, select the Revertive box if revertive operation is desired and set the Restore
Time in seconds for the system to automatically revert to the working card.
6. Select the Protection Direction for the group as either Unidirectional, or Bi-directional
(1+1 only, not 1:n).
Note: OC3 and OC12 SEPIC cards must be configured for Bi-directional.
7. Select the Apply button at the bottom of the window to send new information to the SC
database. This information will be backed up to the NMIC as changes are made.
8. Repeat steps 3 through 7 for each protection group on the shelf or select the Close button at
the bottom of the screen to return to the shelf level GUI screen.
9. Select the next shelf in the network and repeat this procedure until all shelves are
configured.
Stop! You have completed this procedure.