


1152700 • Issue 1 • February 2001 • Section 2 Operations and Maintenance
Page 2-68
© 2000, ADC Telecommunications, Inc.
DLP-706
Page 2 of 11
7. Verify that the NE id sequence is correct and hit Next. If sequence is wrong hit Previous
and return to step 5.
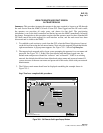
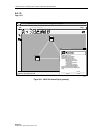
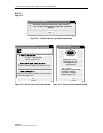
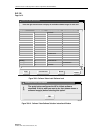
8. The Current Status window appears as shown in Figure 706-7. If the NEs have previously
booted, the status shows “NE booted, Select software image”. See Figure 706-8. If so
double click on each NE using the left mouse button and go to step 10, otherwise, all NEs
status should read “Waiting for NE to boot”. “Waiting for all NEs to boot” is displayed at
the bottom of the window. Follow the instructions at the top of the window.
9. When each NE completes the boot process, select each NE by double clicking on it using
the left mouse button
Note: It is necessary to open the Install Software window for each NE so the NMIC can
verify the status of the RICs and the software selections to be loaded on them.
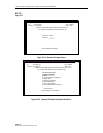
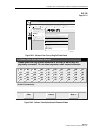
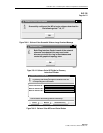
10. The Install Software Load window for the selected NE appears displaying the cards
equipped in each slot of the shelf, and the current running software versions. See Figure
706-9. If the screen is opened immediately following boot up, it is possible that the SCs
will not have had time to discover the cards in the shelf and the screen will appear empty
(except for the SCs). Select a software image for the RIC cards by selecting and holding the
right mouse button on the row of the card to be loaded. A pop-up window appears
displaying any images for that card that are stored on the NMIC.
11. Select a software version displayed in the pop-up window and release the mouse button.
The version is now listed in the Selected Software Image column on the right.
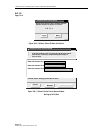
12. Repeat the software image selection for the remaining RIC card and any AIC cards that
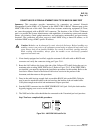
need to be configured. Once all new images have been chosen, select Apply. Selecting
Apply before choosing software images brings up the instructional window shown in Figure
706-10. Selecting the Clear Selected button will reset all selected software images leaving
the last column blank. Refresh can be selected periodically to update all information in the
window. Selecting Cancel will close the window and no software versions will be changed.
13. Select Refresh periodically until the selected software image becomes the running software
image. This may take up to twenty minutes per NE dependent upon card configuration in
the shelf, number of NEs in the ring, distance between NEs, etc.
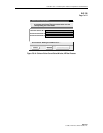
14. Once the software images have been configured successfully, the confirmation pop-up
window appears. Refer to Figure 706-11. This window appears immediately after Apply is
selected but it does not indicate that the RICs have booted. Select OK and then Cancel the
Install Software Load window.
15. The Current Status window reappears and the NE status changes to “RICs have booted, NE
eligible for discovery”. Repeat steps 10 through 16 for each NE configured, then continue
to step 17.