


1152700 • Issue 1 • February 2001 • Operation and Maintenance
Page 2-395
© 2000, ADC Telecommunications, Inc.
DLP-790
Page 4 of 14
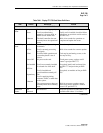
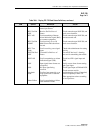
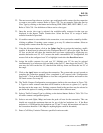
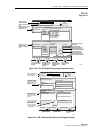
22. The next screen allows the user to select a pre-configured traffic contract for the connection
or create a new traffic contract. Refer to Figure 790-7 for an example. Select the Service
Class Type by clicking on the button and selecting CBR, UBR, UBR1, NRT-VBR1, 2, or 3.
Refer to Table 790-1 for definitions of these service class types.
23. Once the service class type is selected, the available traffic contracts for that type are
displayed in the Ingress Traffic Contract box. Select the Root VC to assign a traffic
contract from the list provided.
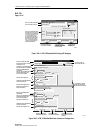
24. If a usable contract is not available for the connection, a new one can be created by double-
clicking on <New>. If creating a new contract, go to step 28, otherwise continue. Select an
existing traffic contract from the list provided.
25. Using the left mouse button, click on the Update Leaf box to assign the interface a traffic
contract. It should now be observed in the Configured Root VCs box to the right. The Root
VC box on the left will show the interface has now been configured by displaying two
asterisks before the root VC id. To remove the traffic contract/Root VC configuration, left
mouse click on the configured root VC to highlight it and select the Reset Root button.
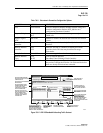
26. Assign the traffic contracts for each root VC. Multiple root VC ids may be selected
simultaneously by a left mouse click and hold on the first VC, then drag to the last VC. The
user may also click on the first VC, then hold the shift key down and select the last VC of
the range.
27. Click on the Apply button to configure the connection. The system takes several seconds to
complete the connection mapping. Once completed it will respond with “Configuration
Successful”. Click on the Close button to close the configuration window and return to the
GUI main screen. Go to step 45.
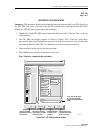
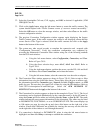
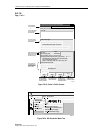
28. The Traffic Contract Configuration screen appears similar to the one shown in Figure 790-
8. Type in a traffic contract name that will be intuitive to the user at a glance (i.e., specify
the data rate in the name, etc.). Existing contracts listed in the next box may be selected to
pre-define the options if creating an identical contract with a different name.
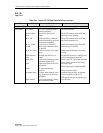
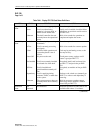
29. Select a Traffic Contract Type by clicking on the desired button. Refer to Table 790-2 for
all traffic contract configuration options.
30. Select a rate unit (Kpbs, Mbps) and enter the peak cell rate for the connection. This rate
should not exceed the maximum data rate for any of the leaf endpoints (i.e., If the Root
endpoint is a 155SM and the leaf endpoints are T3 and T1 cards, the maximum cell rate for
the connection should be 1.544 Mbps as anything higher would be discarded.)
31. Enter a Cell Delay Variation Tolerance specified in microseconds.