


1152700 • Issue 1 • February 2001 • Section 2 Operations and Maintenance
Page 2-78
© 2000, ADC Telecommunications, Inc.
DLP-707
Page 1 of 3
TIME AND DATE
Summary: This procedure describes the steps required to set the system clock at the NMIC in
the Gateway Network Element (GNE). The NMIC maintains the system clock for the entire
network and supports requests from the system administrator to change the system clock. The
NMIC synchronizes every NE’s time-of-day clock to the NMIC time-of-day clock.
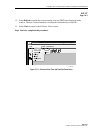
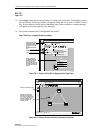
1. Using the left mouse button, select the Configuration pull down menu, and then select the
first item Time and Date (or hit Alt+C, and Alt+D).
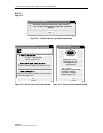
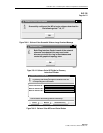
2. Select either Absolute (Alt+A) or Relative (Alt+R) and go to the appropriate heading
below. Refer to Figure 707-1.
Note: Absolute allows the user to set the time and date to the absolute time specified.
This is needed for turn-up or instances when the clock is more than an hour off. Relative
allows the user to adjust the clock in seconds either forward or backwards, up to one
hour, when smaller adjustments are needed.
Absolute
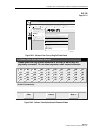
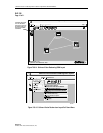
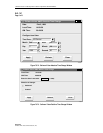
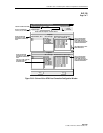
3. The NMIC Absolute Time Change window appears. See Figure 707-2.
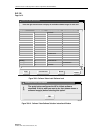
4. The currently provisioned date and time are displayed. To change any of these parameters,
use the left mouse button to select the current month, day of the week, year, hour, minute,
and second by clicking on the up or down arrows beside each data field.
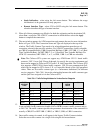
5. After all selections have been made, select Apply.
6. Select Refresh to update the new date and time displayed in the window. The new time
information is automatically downloaded to each NE.
7. Select Close to return to the Cellworx Vision screen.
Stop! You have completed this procedure.
Relative
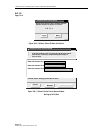
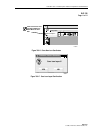
8. The NMIC Relative Time Change window appears. See Figure 707-3.
9. The local time and GMT (Greenwich Mean Time) are displayed. To adjust the current local
time, enter the number in seconds from 1 to 3600 (1-hour) that the clock needs to be
adjusted.
10. Select either backward or forward to adjust the time appropriately.
11. Select Apply to send the new data and adjust the clock.