


1152700 • Issue 1 • February 2001 • Operation and Maintenance
Page 2-407
© 2000, ADC Telecommunications, Inc.
DLP-791
Page 2 of 7
Deleting Connections
5. The user may delete a connection, or multiple connections, by selecting them using the left
mouse button, and then selecting Delete. A confirmation message will appear requiring the
user to select OK or Cancel. If a problem exists with the hardware between the NMIC and
the endpoint shelf controllers, a denial message may appear detailing why the connection
could not be deleted. Refer to DLP-713 and the trouble log for any error reports.
6. To gain status information of a certain connection, the user double clicks on the connection
using the left mouse button, or single clicks to highlight the connection followed by
selecting Status at the bottom left of the window.
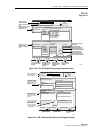
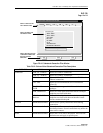
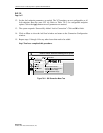
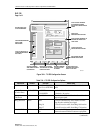
7. The Connection Status window appears similar to the one shown in Figure 791-4. The
connection name is displayed at the top of the window. The administrative state may show
as Locked or Unlocked. Locked indicates the connection is taken down at both ends, no
traffic is allowed on the ring. Unlocked indicates the connection is operable in a normal
state. The user may change options on the connection by selecting Configure. Access to the
Configure screen can also be obtained from the previous Connection List screen via the
Configure selection button found there.
Deleting Endpoints
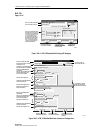
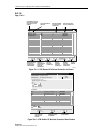
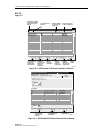
8. Select the Configure button at the bottom of either the status window or the Connection
List window. The Connection Configuration screen appears. Refer to Figure 791-5. The
connection name is displayed at the top of the window. The user may delete n endpoint or
multiple endpoints by selecting them using the left mouse button, and then selecting Delete.
A confirmation message will appear requiring the user to select OK or Cancel. If deleting
the last endpoint on a connection, the system will warn that the root end of the connection
will also be deleted.
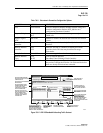
Changing Endpoint Configuration
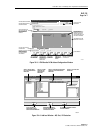
9. Either or both ends of the connection can be configured as OAM cell segment endpoints by
selecting the Segment Endpoint box displayed at each section of the screen. This
functionality can be used for maintenance or troubleshooting purposes. Select Apply to
send configuration changes to the database or close to abort any changes.
10. The “Configuration Change Completed” window appears. Select OK.
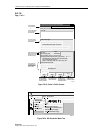
Adding Leaves to a Multicast Connection
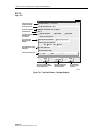
11. Leaves may be added to the connection using the Add Leaf button at the bottom of the
Connection Configuration window. The Leaf Endpoint Configuration screen appears
similar to the one shown in Figure 791-6.