


1152700 • Issue 1 • February 2001 • Section 2 Operation and Maintenance
Page 2-432
© 2000, ADC Telecommunications, Inc.
DLP-795
Page 10 of 11
10 UPGRADE THE BOOTROM FLASH
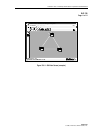
47. From the main GUI screen (which is running on the slot 2 NMIC), open the Gateway
Network Element (GNE) pop-up menu by right-clicking on the GNE icon (the text
underneath the GNE icon will be yellow - text for all other NE icons is in white). Select the
Reflash Boot Image menu option.
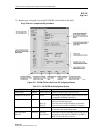
48. In the resulting screen, select the release 3.1 bootrom for each card installed in the shelf
(except the NMIC). To do this, right-click on each row in the table and select the
appropriate bootrom image. The following images should be selected:
SCC = 3.1.0.0 (the SCC flash image was previously installed in step 36)
AIC/RIC = 3.0.1.3
49. Once release 3.1 bootrom images have been selected for all cards in the GNE shelf, click
the Apply button. Wait about 5 minutes and then click the Refresh button to update the
download status for the cards. All cards should say, "Loaded". If not, wait a few more
minutes and click Refresh again.
50. Once all cards are loaded with the release 3.1 bootrom, each card in the shelf must be hard
reset to load the new bootrom.
Note: Hard resetting a card is traffic affecting. When you upgrade the flash bootrom on
each card, you may want to take this into consideration. To minimize traffic loss, you
should consider using 1+1 or 1:N protection and resetting the cards such that a card is
always active. This will take longer, but you will avoid traffic loss.
51. Repeat steps 50 through 55 for each NE in the ring.
52. Following hard reset of all cards in all NEs in the ring, software upgrade is complete.
Stop! You have completed this procedure.