


1152700 • Issue 1 • February 2001 • Operation and Maintenance
Page 2-347
© 2000, ADC Telecommunications, Inc.
DLP-783
Page 2 of 4
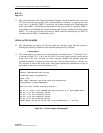
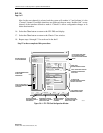
1. From the workstation establish a Telnet session to the Cellworx system using the floating
NMIC IP address.
2. At the Login prompt, logon as the root user.
CREATE A NEW USER
3. To create a new user, enter the following command using user defined variable for
username, and the GUI defined access level of 1, 2 or 3. Refer to the summary for
definitions of GUI user levels at the beginning of this procedure if needed. Use the LINUX
command “make user” followed by a space, then the user name assigned by the
administrator followed by a space, and the GUI access level followed by an Enter or
Return.
• mkuser <username> <GUI access level>
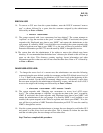
4. The system responds with “created user <username> with user ID <id number>” and
prompts the administrator for a LINUX password. If needed, enter a password for the user
for authentication purposes followed by an Enter or Return. The password will not appear
on the screen as you type. This will allow the user to access the LINUX system but does not
affect the graphical user interface access.
Note: The LINUX system will not allow a password that is defined as a dictionary word
or based upon any user information that is considered unsecured.
5. The system asks the user to retype the password. Retype the password entered in step 4
exactly as it was entered previously followed by an Enter or Return.
6. The system should respond with “all authentication tokens updated successfully”. If the
password was not reentered correctly, the system prompts the user to start the LINUX
password process over.
7. The system now prompts the user for “finger” information on the new user. The finger
information enables the administrator to identify users by their logon name and “finger”
them in system activities. Enter the real user’s name followed by an Enter or Return.
8. The system asks for the office number of the new user. Enter the office number if
applicable followed by a Enter or Return or just skip it by hitting Enter or Return.
9. The system then asks for the office phone number of the new user. Enter the office phone
number for contact information purposes if needed followed by an Enter or Return or just
skip it by hitting Enter or Return.
10. The system prompts for the home phone number of the new user. Enter the home phone
number for contact information purposes if needed followed by an Enter or Return or just
skip it by hitting Enter or Return.