


1152700 • Issue 1 • February 2001 • Section 2 Operations and Maintenance
Page 2-57
© 2000, ADC Telecommunications, Inc.
DLP-702
Page 2 of 5
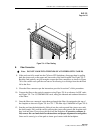
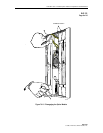
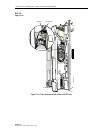
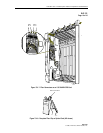
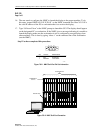
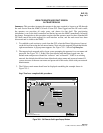
2. Open the lower hinged faceplate of the working NMIC card in slots 2-3, as shown in Figure
702-2, and locate the DB9 craft connector.
3. Plug the craft cable into the NMIC card craft port and hit return to get the login prompt.
1. MODIFYING THE NMIC IP ADDRESS
4. The NMIC must have its IP address configured to a valid IP address compatible with the
local network. This will enable the Graphical User Interface (GUI) to be displayed either
on a networked PC operating as an X-server or on a workstation. A single NMIC requires
the use of a unique IP address and an additional IP address shared by both NMICs, referred
to as the Active IP address. A pair of NMICs (working and protect) require the use of 3 IP
addresses. The Active IP address must be configured the same on both NMICs to allow it to
float between the two depending on which one is active. The active NMIC will respond to
both its own IP address and the Active IP address. The stand-by NMIC will only respond to
its own IP address. By using this floating Active IP address the user can communicate with
the Cellworx system using a single IP address regardless of which NMIC is active. Refer to
Table 702-1 for details on the required IP addresses on a single NMIC, and Table 702-2 for
a working /protect NMIC. If a NMIC is replaced, the replacement must match the setup of
the one being replaced.
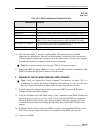
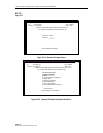
Table 702-1. NMIC IP Address Requirements
SINGLE NMIC IP ADDRESS A IP ADDRESS B ACTIVE IP ADDRESS
NMIC (NMIC A) XX
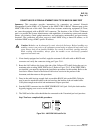
Table 702-2. NMIC IP Address Requirements
WORKING/PROTECT NMIC IP ADDRESS A IP ADDRESS B ACTIVE IP ADDRESS
NMIC A XX
NMIC B XX
2. CHANGING THE IP ADDRESS OF A NMIC:
5. To change either the NMIC IP address or the Active IP address for that NMIC, login to it
either via telnet or though the RS-232 front panel console port. Upon initial shipment the
user should perform login via the “root” userid. There is no password.
6. The user will see a [root@nmicx (x = 2 or 4)] prompt. The status LED on the NMIC should
turn amber before continuing. This may take two to three minutes. Execute a “killall –9
psm” command on the NMIC to stop the NMIC Cellworx processes. If the NMIC has
already reached a “double green” LED condition, execute a “killall psm nmic” command.