


1152700 • Issue 1 • February 2001 • Section 2 Operation and Maintenance
Page 2-418
© 2000, ADC Telecommunications, Inc.
DLP-798
Page 2 of 3
11 FLASH FALLBACK
5. Perform the following steps for each NE in the ring:
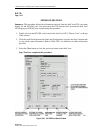
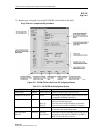
• Invoke the Flash Upgrade screen in the GUI on the slot_2 NMIC.
• Select release 3.0 boot images for each card in the shelf and press the ’Apply’ button.
• Execute a hard reset on each card immediately following successful download. Note
that this can be traffic affecting, so you should take similar steps as done in software
upgrade. See that procedure for details.
Note: If the procedure is aborted anytime after flash fallback, you should reinstall
release 3.1 flash for all cards.
12 SOFTWARE FALLBACK
6. Start the fallback procedure on the slot_4 NMIC (the standby NMIC). This step invokes a
graphical procedure that walks you through the fallback steps for this NMIC. At the end of
the procedure, all Cellworx application processes are killed. Keep the telnet session open,
though, because the standby NMIC needs to be manually rebooted following active NMIC
fallback.
• cd /cellworx/bin
• ./cw_swfallback -s 3.0.1.0
7. After standy NMIC upgrade completion, start the fallback procedure on the slot_2 NMIC
(the active NMIC). This step invokes a graphical procedure that walks you through the
necessary steps for reverting software for the entire ring. These steps are identical to
software upgrade except you will be loading release 3.0 software into the offline memory
banks for each card in each NE instead of release 3.1 software.
• cd /cellworx/bin
• ./cw_swfallback -a 3.0.1.0
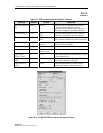
As with software upgrade, you will need to periodically click the ’Refresh’ button to
determine when each card has downloaded the designated release 3.0 software image.
When all cards for all NEs have downloaded the image, each entry in the main screen will
read, "NE is eligible for switchover." At this point, click the ’Next >>’ button to continue
with the procedure and restore the release 3.0 databases. Note that these databases are
currently in the /cellworx/config directory with the extension, ".release3.0". At the end of
the procedure, the slot_2 NMIC is automatically rebooted.
8. Following slot_2 NMIC reboot, start the CellworxVision GUI on the slot_2 NMIC.