


1152700 • Issue 1 • February 2001 • Section 2 Operation and Maintenance
Page 2-199
2000, ADC Telecommunications, Inc.
DLP-739
Page 1 of 4
DELETE CONNECTIONS
Summary: This procedure describes the steps necessary to successfully navigate the Cellworx
Vision Graphical User Interface to view the established connections at a node and delete them.
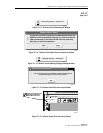
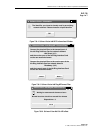
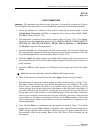
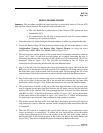
1. Access the Subnetwork Connection Filter window using the left mouse button to select
Configuration, Connection, and View (or using the direct selection keys, Alt+C, Alt+N,
then Alt+V). Refer to Figure 739-1.
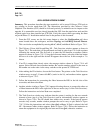
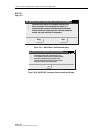
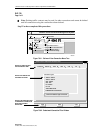
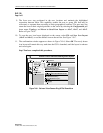
2. The Subnetwork Connection Filter window appears. Refer to Figure 739-2. If not already
displayed, select the Connection tab and click on ATM VP-ATM VP, ATM-VC-ATM VC,
CES-ATM VC , CES-CES, FR-ATM VC, FR-FR, ATM VP Multicast, or ATM Bundled
VC Multicast using the left mouse button.
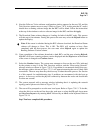
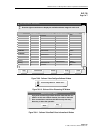
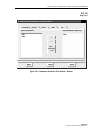
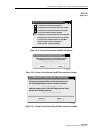
3. Select the Network tab, which displays all NEs in the network, and select the NE that has
the connection being deleted. Click on the >> button using the left mouse button which will
move the highlighted NE to the selected box. Refer to Figure 739-3.
4. Select the Traffic tab, which displays all available traffic contracts that can be specified for
the connection retrieval. Click on the All>> button using the left mouse button to choose all
traffic contracts.
5. Select the ATM tab which displays all ATM ports in the network and click on the All>>
button.
Note: The user may optionally select the “Retrieve All” button instead.
6. Once all information is selected for the NE, select Apply using the left mouse button.
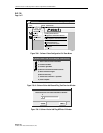
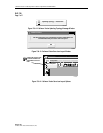
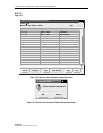
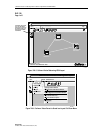
7. The Subnetwork Connections window appears as shown in the example in Figure 739-4.
The status column indicates the most current information for the connection. The status
may be listed as Incomplete, Functional, or an Unknown State. Up to 100 entries may be
viewed per page by using the up and down slide button on the right side of the window. If
more than 100 entries are available for viewing, the user may use the Page slide button at
the top right corner of the window to select additional pages. Select the traffic connections
one at a time or multiple connections using the Ctrl or Shift key plus using clicking the left
mouse button on the desired connections, followed by the Delete button at the bottom
center of the window. When selected, the line or lines the connection(s) is displayed on will
become highlighted.
8. After selecting Delete, a confirmation message appears as shown in Figure 739-5. which
requires the user to select OK or Cancel. If a problem exists with the hardware between the
NMIC and the endpoints shelf controllers, a denial message will appear stating the reason
the connection could not be deleted. Refer to the TAP section of this document for any
error reports.