


1152700 • Issue 1 • February 2001 • Operation and Maintenance
Page 2-396
© 2000, ADC Telecommunications, Inc.
DLP-790
Page 5 of 14
32. Select the Sustainable Cell rate, CLP, tagging, and MBS as desired if applicable (ATM
VBR QOS Class II).
33. Click on the Apply button using the left mouse button to create the traffic contract. The
system should respond with “Traffic Contract <name of contract> created successfully.”
Select the OK button to close the message window, and then select Close on the traffic
contract configuration window.
34. The previous Connection Configuration window appears again displaying the Ingress
Traffic Contract types. If the traffic contract just created is not displayed, ensure that the
correct Service Class Type is selected. Select the traffic contract and click on the Apply
button at the bottom of the screen.
35. The system may take several seconds to complete the connection and responds with
“Configuration Successful”. Verify the connection configuration was completed by
accessing the Subnetwork Connection Filter window using one of the following methods
from the GUI main window:
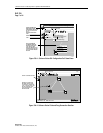
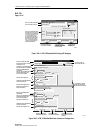
a. Using the left mouse button, select Configuration, Connection, and View.
Refer to Figure 790-9.
b. Using the direct selection keys, enter Alt+C, Alt+N then Alt+V. Refer to
Figure 790-9.
c. Using the right mouse button, position the cursor over the NE, click and hold
the button, select View Connections, and release the button.
d. Using the left mouse button, select the connection icon above the workspace.
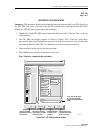
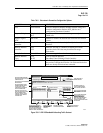
36 The Connection Filter window appears as shown in Figure 790-10. Select a topic to filter
information from using the folder tabs shown. These topics allow the user to retrieve only
the information desired by Connection type, Network available, Traffic contract, or ATM
traffic by port. The user may also specify all of these by using the All checkbox. Refer to
Table 790-2 for descriptions of each filter type. Select the ATM BUNDLED VC
MULTICAST button and the Apply at the bottom of the screen.
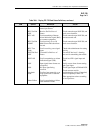
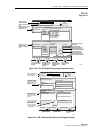
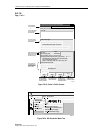
37 The Connection List window appears as shown in the example in Figure 790-11. The list of
connections can be displayed alphabetically by the connection name or by the NE name by
using the Format pull down menu and selecting Sort by Name, or Sort by NE. The status
column indicates the most current information for the connection. The status may be listed
as INCOMPLETE, FUNCTIONAL, or as an UNKNOWN STATE. This screen displays up
to 100 entries per page by using the up and down slide button on the right side of the
window. If more than 100 entries are available for viewing, the user may use the slide bar
on the right side of the window to scroll through the entries.
38 If a connection is displayed as INCOMPLETE, select it using the left mouse button to
highlight it and then select Retry to attempt to establish the connection.