


1152700 • Issue 1 • February 2001 • Section 2 Operation and Maintenance
Page 2-133
2000, ADC Telecommunications, Inc.
DLP-723
Page 1 of 5
CHANGE CONFIGURATION/TEST AN EXISTING CONNECTION
Summary: This procedure defines the steps required to successfully change configuration
options on an existing connection or initiate an OAM cell generation/loopback or a continuity
check on the connection. Changing the configuration may entail locking/unlocking the
administrative state, changing the name of the connection, changing to/from a segment endpoint,
or enabling/disabling NDC data collection on a connection. The user must first have accessed the
system and launched the graphical user interface before attempting this procedure.
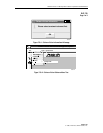
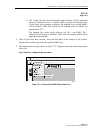
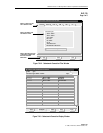
1. Access the Subnetwork Connection Filter window using one of the following methods:
a. Using the left mouse button, select Configuration, Connection, and View.
Refer to Figure 723-1.
b. Using the direct selection keys, enter Alt+C, Alt+N then Alt+V.
c. Using the right mouse button, position the cursor over the NE, click and hold
the button, select View Connections, and release the button.
d. Using the left mouse button, select the connection icon above the workspace.
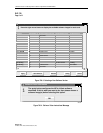
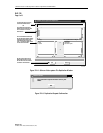
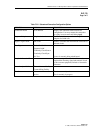
2. The Cellworx Vision Subnetwork Connections window appears, similar to the example
shown in Figure 723-2. Using the tabs, go to each page and select the Connection type,
Network Element, Traffic Contract, and ATM or CES interface and then hit the Apply
button at the bottom of the screen. The user may elect to select the connection type and the
“Retrieve all selected type connections” button followed by the Apply button. This avoids
having to select individual interfaces and nodes on the other pages.
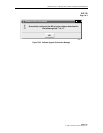
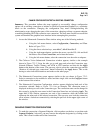
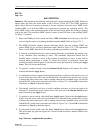
3. The Subnetwork Connections screen appears similar to the one shown in Figure 723-3.
Select a connection to be modified or tested and then single click on the Configure button
at the bottom of the window.
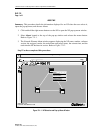
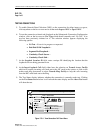
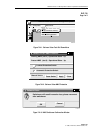
3. The Subnetwork Connection Configuration window appears displaying both ends of the
connection selected. Refer to Figure 723-4 for an example. The connection name is
displayed at the top as well as the connection type. The connection name can be changed in
this screen by typing the new name in the Connection Name box and selecting Apply. The
upper half of the window represents one end of the connection while the bottom half
represents the other end of the selected connection. The user may now lock the connection
out or release a locked out connection by selecting the pad lock on the upper right corner of
the window.
CHANGING CONNECTION CONFIGURATIONS
4. To make the connection a Segment Endpoint, click anywhere on the box or text that reads
Segment Endpoint. Adversely you may remove the endpoint designator by clicking on the
same. This is true for either end of the connection.