


Excluded Nodes 4-25
List Views
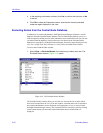
3. Click Yes to confirm. The node or nodes will be moved from the Excluded
Nodes database to the central node database, and appear again in all
appropriate list views.
4. Click Close to close the excluded nodes window.
Re-included nodes will be displayed as appropriate in all list and tree views, and can be
re-added to map views, as desired.
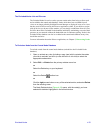
To Delete a Node from the Database
You can also choose to remove nodes entirely from the NetSight Element Manager
database, either directly from the Node Delete window (bypassing the excluded nodes
database), or from the Excluded Nodes database itself. Nodes which have been entirely
removed are not protected from re-discover, and will be automatically re-added to the
database if they are discovered. Deletion from the database cannot be undone, except by
re-discovering or re-inserting the nodes you want.
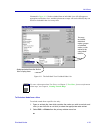
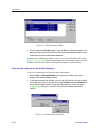
To delete a single node or group of nodes directly from a view:
1. Open or activate any view (including a map view) which contains the nodes
you wish to delete, and click (or use shift-click or ctrl-click) to select the
appropriate node entries.
2. Select Edit —>Delete from the primary window menu bar.
or
Select the Delete key on your keyboard.
or
Select the Delete toolbar icon.
or
Click the right mouse button on any of the selected entries, and select Delete
from the resulting menu.
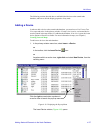
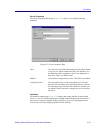
The Node Delete window (Figure 4-17) opens, with the node(s) you have
selected for deletion highlighted in the central window.
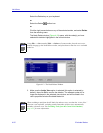
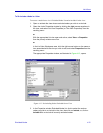
TIP
Remember, you can also click on any column header in the Excluded Nodes list to re-sort
the nodes according to the information in the selected column; entries are always sorted
in ascending order.