


Using the Subnets Window 3-29
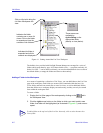
Discovering Nodes
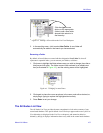
2. Follow the steps outlined in Defining and Selecting Subnets, beginning on
page 3-7. The procedure for defining and modifying subnet entries is the
same from this window or when configuring a discover script.
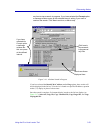
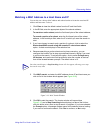
3. Click OK to save your subnet discovery parameters and exit the Subnet
Properties window. The name, description, address, and subnet mask of the
defined subnet opens in the Subnets window.
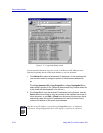
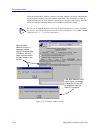
Deleting a Subnet Entry
1. In the Subnets window, highlight the name of the subnet(s) to be deleted, and
click Delete.
or
In the Subnets window, click the right mouse button on the subnet to be
deleted, and select Delete from the resulting menu.
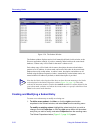
The selected subnet entry will be deleted from the Subnets window, as well as from the
Subnets group box on the Device page of the Discover Properties window (see Defining
and Selecting Subnets, page 3-7, for more information).
NOTE
Deleting a subnet entry will not delete that subnet’s nodes from NetSight Element
Manager’s central node database.
TIP
If you delete a subnet entry from either the Subnets window or from the Subnets group box
on the Device page of the Discover Properties window, that subnet will not be included in
any automatic subnet mapping that takes place. See Generating Submaps Automatically
in Chapter 6, Creating Network Maps, for more information on subnet mapping.