


Tree Views
5-2 About Tree Views
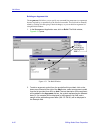
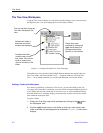
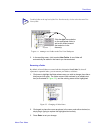
The Tree View Workspace
Using the Tree View workspace you can access and edit existing views, create new ones,
and organize your views by arranging them in a hierarchy of folders.
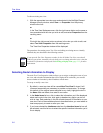
Figure 5-1. Getting Around the Tree View Workspace
The default tree views provided with NetSight Element Manager are placed in the root
Tree Views folder. All of these default views — except the read-only All Nodes Tree
View — can be edited or deleted; you can also add additional views and/or folders.
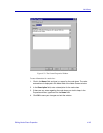
Adding a Folder to the Workspace
As a means of organizing a collection of Tree Views, you can add a folder to the Tree
View page of the workspace; each folder you create will be contained within the root Tree
Views folder, and each can contain one or more tree views, as well as additional folders.
Note that folders are a workspace display convention only, and they can only be created
from within the workspace itself.
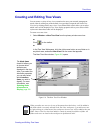
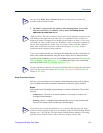
To create a folder:
1. Display the Tree View page of the workspace by clicking on the tab in
the Workspace View.
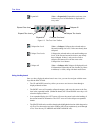
2. Click the right mouse button on the folder to which you want to add a new
folder; that folder will be highlighted (as illustrated in Figure 5-2), and a menu
displays.
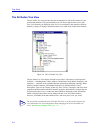
These menus are
available by clicking the
right mouse button on
the appropriate folder
(above) or view (below).
Indicates the folder
contains one or more
tree views. Click on the
folder to expand and
view the contents of the
folder.
Indicates the folder is
expanded and all the
contents are displayed.
Click on this tab to bring the
Tree View Workspace into
view.