


Node Management Overview
7-2 Device Management
1. In any map, list, or tree view, click the right mouse button once to select the
device you wish to manage.
2. On the resulting menu, click to select Manage.
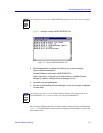
You can also access Device Manager and Chassis Manager from the Start menu:
1. From the Start menu, select Programs > Enterasys Networks > NetSight
Element Manager > Device Manager (or Chassis Manager).
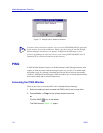
2. Enter the desired IP address and community name, and click OK. The Device
View opens.
Once a Device View window is launched, it will operate as described in the
device-specific User’s Guides.
A Brief Overview of Device Management
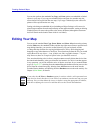
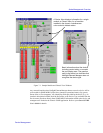
After you launch device management, the appropriate Chassis View or Device View
window (as illustrated in Figure 7-1) opens. This window is the color-coded graphical
interface that provides you with immediate feedback on device configuration and status,
and lets you access further device management windows.
For devices which NetSight Element Manager specifically supports, a description of the
device, along with its IP address, displays in the Module or Chassis View window title.
Menus at the top of the front panel display, or available from the interface display itself,
allow you to manage the device at various physical levels (device, board, or port) and
functions (FDDI, repeater, or bridge), and provide access to a variety of utilities.
If NetSight Element Manager can only communicate with a device via standard MIB I or
MIB II objects, it will have no device-specific management available. In this case, a
“generic” window opens.
Figure 7-1 shows three management windows: both a Module View and a Chassis View
window for the SmartSwitch, and a “generic” Chassis View window for use with an
SNMP device which is not specifically supported by NetSight Element Manager.