


Customizing Your Map 6-31
Creating Network Maps
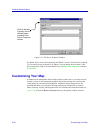
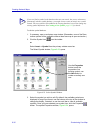
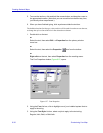
Figure 6-24. Global Symbol Properties Window
4. To change the label assigned to all symbols of the selected type, click in the
Label field, and enter the desired text.
5. To change the numeric identifier assigned to the symbol type, click in the
Identifier field, and enter a new numeric value.
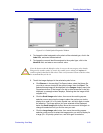
6. To edit the image displayed in the selected symbol’s icon:
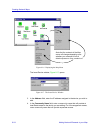
a. Click Browse; in the resulting File Open window, select the bitmap file
you wish to use as a basis for the symbol image, then click Open. The
selected bitmap image will be displayed in the Images: display area in the
Properties window. (If the image is too big in either dimension to be fully
displayed, a message window displays, indicating that the image will be
cropped to fit.)
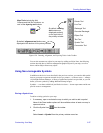
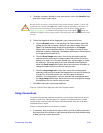
b. Click the Small Image radio button, then move the resulting square
selection cursor around on the image to select the portion you wish to
display for a small (16 x 16 pixels) symbol icon, and click again to make
the selection. The image portion you have selected will be displayed
below the Small Image radio button. Move the cursor and click again to
change this selection until you find the one you want.
c. Click the Large Image radio button, then move the resulting square
selection cursor around to select the image portion you wish to display for
a large (32 x 32 pixels) symbol icon, and click again to make the
!
CAUTION
If you do choose to edit the Identifier value, be sure you do not assign a value already
being used by another symbol; if you do, the symbol you are editing will replace the
symbol originally identified by that value. There is no functional reason to edit this value;
we recommend that you do not.