


Creating Network Maps
6-44 Customizing Your Map
To align selected objects to the top of the controlling object, click on the
Align Top button or select Layout—>Align—>Top.
To align selected objects to the bottom the controlling object, click on
the Align Bottom button or select Layout—>Align—>Bottom.
4. The aligned objects remain selected after the alignment procedure is
complete; you can move the group as a whole by clicking and holding the left
mouse button, and dragging the group of objects to the desired map location.
To de-select the objects, click anywhere in the map background.
Note that these tools align only the selected edge; to control the spaces between objects,
use the Space Evenly options described below.
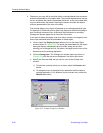
Space Evenly (Horizontally or Vertically)
You can also use the layout tools to evenly space selected objects between the left-most
and right-most selected objects (Space Evenly—>Horizontally) or between the top and
bottom selected objects (Space Evenly—>Vertically). When you use this feature, the
outside objects (left and right, or top and bottom) don’t move, so make sure there’s
enough room between the two outside objects to arrange the remaining selected objects.
Note, too, that these tools only control the space between objects, and will not arrange the
objects in a straight line — for that, you will need to use the Align Top, Bottom, Left, or
Right tools described above.
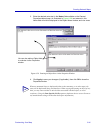
1. If necessary, open or activate the map which contains the objects you wish to
space. (Remember, neither the Alignment Toolbar nor the Layout menu
options will be active unless a map window is active.)
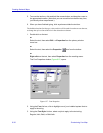
2. Select the objects you wish to space by clicking the mouse button and
dragging to enclose the target objects, pressing and holding the Ctrl key and
select the target objects, or by using the Edit—>Select All or Edit—>Select
All Nodes options on the primary window menu bar. Remember, spacing will
take place between the top and bottom selected objects (for vertical spacing)
or between the left-most and right-most objects (for horizontal spacing); these
outside objects will not be moved.
3. Once you’ve selected the objects you wish to space, release the Ctrl key (if
necessary) and click on the appropriate alignment tool, as follows:
To space selected objects horizontally, click on the Space Horizontally
button or select Layout—>Space Evenly—>Horizontally from the
primary window menu bar.
To space selected objects vertically, click on the Space Vertically
button or select Layout—>Space Evenly—>Vertically.
4. The spaced objects remain selected after the alignment procedure is
complete; you can move the group as a whole by clicking and holding the left
mouse button, and dragging the group of objects to the desired map location,